
If you have spent more than five minutes inside the AWS Management Console, you have probably had that moment where you were staring at the screen thinking, there has to be a faster way to do this. Don’t worry, you are not alone. I have been there myself, especially when you are juggling multiple accounts, deploying things, checking EC2 statuses, verifying S3 buckets, and so on, clicking through 6 to 7 screens feels painfully slow. So we bring you how to configure AWS CLI to speed up work on Amazon Cloud.
In today’s post, we are going to check out what AWS CLI is, why AWS CLI still matters, how to configure it, and some use cases and best practices to speed up the workflow. Without further ado, let’s get started!
What is AWS CLI
The full form of AWS CLI is Amazon Web Services Command Line Interface. It is simply a tool that lets you interact with AWS services through commands instead of the management console. Remember how you run commands in Linux environments to do file management, package management, system management, or process management? the same thing you can do using AWS CLI, but for AWS Services. The AWS CLI wraps hundreds of AWS services into simple terminal commands. Once you configure it properly, it becomes a utility to speed up your workflow.
Why AWS CLI Still Matters?
You might wonder, isn’t everything automated these days? well, that is a fair point. We have Terraform, CloudFormation, GitHub Actions, Ansible, and a million AWS services. But here’s the truth from real world use. You wish to do a quick diagnostics, AWS CLI beats everything. Let’s say you have cross account tasks, with AWS CLI it is instant to switch accounts and do it, without having to log in and out. Most of the DevOps scripts rely on CLI under the hood, so it’s sort of the backbone for automation.
You also can not forget the fact that sometimes the AWS console glitches. Sometimes your workspace VPN has problems loading the console, or it does not load correctly even after trying 2 to 3 times. That is where AWS CLI comes in handy, it never lies. Last but not least, it saves your time, because waiting for the console to load, switching tabs, and then navigating all the way down can be a little time consuming, as command processing is still faster than the UI. Just like how API’s can get the content faster than you waiting for a web page to load to get its content.
How to configure AWS CLI?
Now, let’s walk through how to actually configure AWS CLI.
Step 1) Create a User in IAM
Log in to your AWS account and access the IAM service. Once you are in the IAM, look for the Users section and click it. Click on Create user to create a user and give it a user name, and click Next. Now, next is about attaching the policies to your user, which basically means what your created user gets to do with the level of access. Be very sure with this step because it is very important what level of access you are giving to the user, as you don’t want to risk your account or your company’s account just because someone was goofing around.
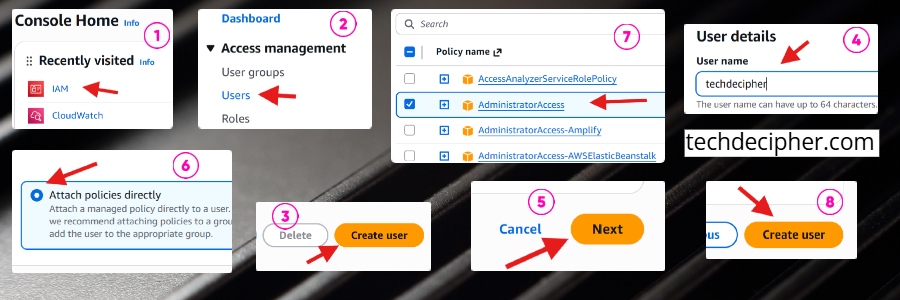
Now, in general, there are 2 ways someone would think about setting these policies.
- For personal learning on your own account: You can go with AdministratorAccess policy
- For company accounts/office work: usually, there is a different way to get it done, like IAM Role + SSO, so you should follow company policy in such cases.
Remember and then think this through before making a decision, and once you have made it, click on Attach policies directly option and search/tick the policies you would like to give to your user. In my case, I am going with AdministratorAccess policy, which means that my user could do anything with AWS resources. Click next and create your user, that’s it, the user is created.
Step 2) Create access IDs & Keys
In this step, we need to create the Access key and Secret key that we will be needing when we configure AWS CLI in our coming steps. For this, click on the user you created and navigate to the Security credentials tab. From here, you would need to click on Create access key under the Access keys section. You will see a list of use cases, and for our case, choose the first use case that is Command Line Interface (CLI) and mark the check box of confirmation and hit next. It’s good if you give a bit of description for later justification, and just hit the Create access key.
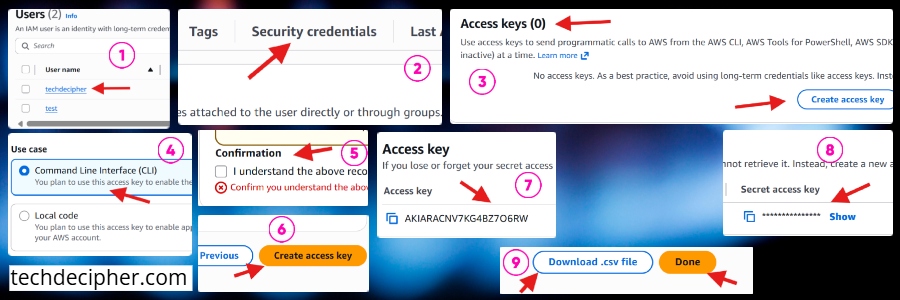
You get 2 options to retrieve the access keys, one is what you will be shown in the screen right after you create an access key, and the second is a CSV file. You can download a CSV file to keep a note for any unfortunate event, like if you lost the notation of the key, then this CSV file can save you. The main reason behind that is that, access key and secret key can only be seen or downloaded once, if you miss that, feel free to re-create it again.
Step 3) Install AWS CLI on your machine
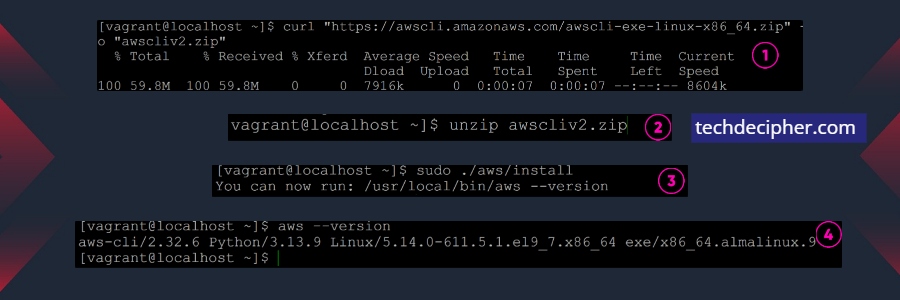
We have completed IAM user creation and access key IDs generation, its time to actually install the AWS CLI in your machine. Think of this as your connector, the connector which is AWS CLI is gonna use the keys to access resources or perform any operation on the cloud using commands. For this blog, I am installing it on one of the Linux flavours, Alma Linux 9. If you ever wish to do this on a Windows machine instead, grab the MSI installer from the link here. Now I am continuing with Linux, assuming you have logged on to the machine, please follow commands below to install AWS CLI.
unzip awscliv2.zip
sudo ./aws/install
aws –version
Once you have verified and it is what you see in the screenshot, well then, the installation is successful, and we move to the next step.
Step 4) Configure AWS CLI
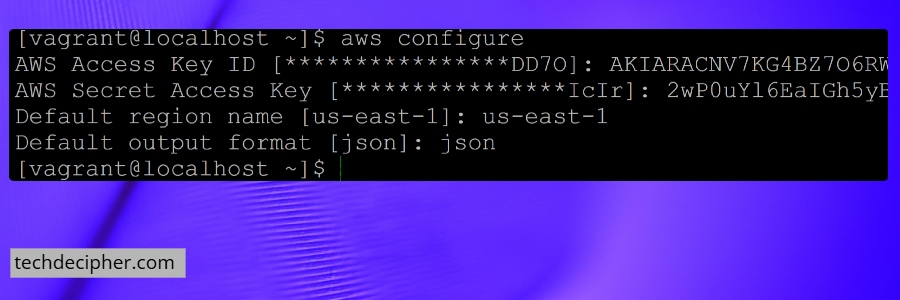
Installation is completed, now we need to configure it so we can interact with AWS resources further. Configuration isn’t a big of a deal, actually, you just follow the commands below, and that would do it.
Right after you type the command, you will be prompted for the following options, just like how you see them in the above screenshot. In my case, I already set up the account, which is why you see it already having an entry of the old account, but I am gonna set it up for you one more time.
- AWS Access Key ID: the access key
- AWS Secret Access Key: the access key
- Default region → pick the region you wish to operate your commands in (e.g., us-east-1)
- Default output format → type json
Personally, I like JSON because it plays nicely with scripts and is also readable at the same time. When you have done that, and you didn’t get any error in sequence, it means the configuration is done.
Use Cases & Modern Best Practices of AWS CLI
As we have installed and configured the AWS CLI, it’s time we see the basic use cases and modern best practices you can use to leverage it.
1) Check EC2 instances
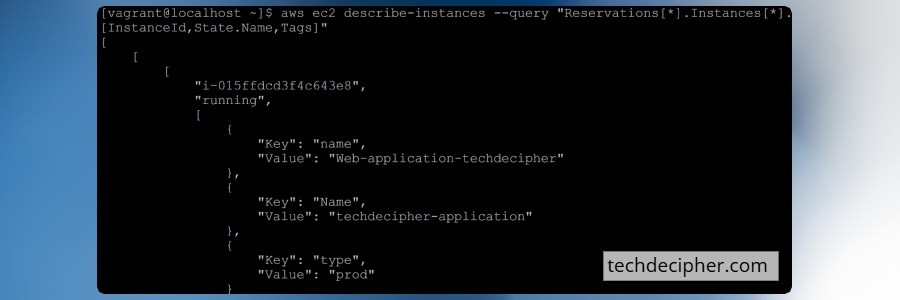
Let’s say you want to check the list of all EC2 instances, running, and stopped instances, then you would run below command.
You might wonder, where am I getting all these commands from? AWS has already made it public, and you can review them too. To use as per your use case, you can check from the link here.
2) Check S3 Buckets
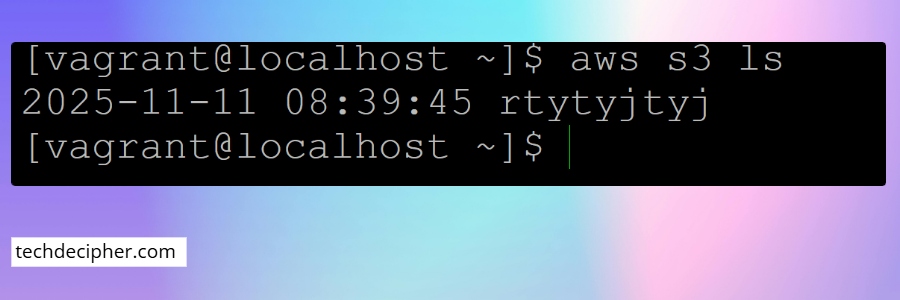
Here is a simple one, you want to check the list of S3 buckets you have in your AWS account, you would do something like this, as shown above.
As always, just make sure to go through the reference of commands, which you can find here.
3) Using AWS CLI Named Profiles for Faster Switching
This is where the magic really starts. If you’re working with more than one AWS account, specifically in your company environment, then switching accounts in the console becomes annoying. AWS CLI Named Profiles really solves that. The basic thing you would do for this is you would type the same command as you used to configure it, along with –profile option and the env name, such as dev, prod, or staging.
aws configure –profile env-name-of-aws-account
eg:
aws configure –profile dev
aws configure –profile prod
You would be prompted for the same information you did when you initially configured it. You would choose as per your environment and configure it. To switch between environments, just type the following command.
4) Boosting Productivity with AWS CLI Aliases
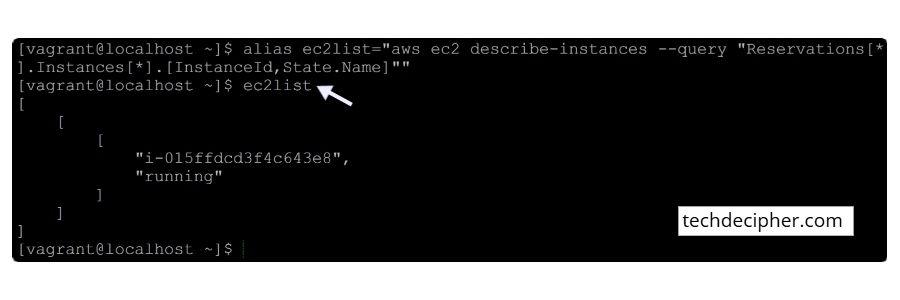
This is where CLI goes from helpful to why didn’t I do this earlier? Let’s say you check EC2 statuses every now and then. Typing the full command gets tiring, and with aliases, you can create shortcuts to your most used commands and run them easily without having to type them all. Just follow the command below for it.
alias ec2list=”aws ec2 describe-instances –query “Reservations[*].Instances[*].[InstanceId,State.Name]””
ec2list
5) Changing Regions
If you have a task that requires you to access resources or do something in different regions than what you currently have set. This is doable, and mind you, it’s very straightforward. First, you get the region to know which region you are in and follow the commands below to do it.
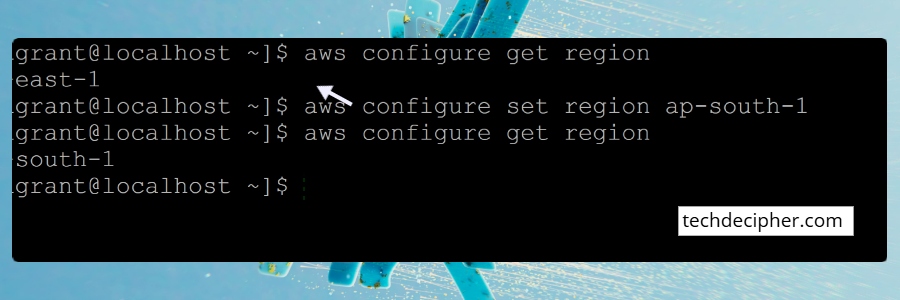
Change default region
aws configure set region ap-south-1
Change region for a specific profile
Conclusion
If you have read this far, you are probably serious about speeding up your AWS workflow. The good news is, the AWS CLI is your best friend for that. Once you configure it properly and start using profiles, aliases, and efficient commands, you will notice your cloud work becoming smoother and significantly faster. Whether you’re a beginner trying to understand AWS or you are deep into DevOps, mastering the CLI will instantly elevate your cloud workflow. This concludes how to configure AWS CLI to speed up work on Amazon Cloud. What other hacks do you use to speed up your AWS workflow, and what did you learn today? Do let us know in the comments section below. Are you interested to learn more about AWS? 2 years ago, I created hands on for the EC2 service of AWS, to check more about it, click here. If you need any help or have any suggestions to make, then do reach out via the contact page here. I also provide services to help you with your issues, which you can find here. Happy Barbados Independence Day!