If you’ve been working with AWS Lambda, you’ve probably seen the “Layers” section and thought, “Hmm… I’ll explore that later.” I did the same. But once I actually started using it, I realized how powerful and underrated it is. If you’ve ever wondered how to make use of layers in a Lambda function, or why experienced cloud engineers rely on them, then this how to make use of layers in a Lambda function guide will walk you through it.
In today’s post, we are going to check out what Lambda Layers are, why use Lambda Layers, and how to use layers in Lambda Functions. Without further ado, let’s get started!
What are Lambda Layers?
A Lambda Layer is basically a shared package of code or libraries that multiple Lambda functions can use. Think of it like this. Imagine you own multiple mobile apps. Instead of installing WhatsApp separately inside each app, you install it once and let all apps access it when needed. Lambda Layers work the same way. They allow you to separate your main function code, your dependencies, and libraries. So your Lambda function stays clean and lightweight.

AWS stores layers separately, and your Lambda function simply connects to them when it runs. Lambda Layers are a way to separate your function code from your dependencies. In AWS Lambda terms, a layer is a ZIP file. It contains libraries, dependencies, or shared code that can be attached to multiple Lambda functions.
Why use Lambda Layers?
This is the real question. Why not just install everything inside the Lambda function itself? Technically, you can’t. Let me share you my experience. I know the time when I was given a task where I needed to run Github commands and I blindly tried it. I failed, I was like why this Python code isn’t running my Github commands? And no not everything you can do with Github APIs so I literally needed to run Github commands like how someone would do in their Linux boxes. And then I figured that’s sort of thing we can’t do directly in a Lambda Function. We need git installed somewhere which Lambda Functions uses to run git commands and this is why I thought to write this blog up.
Here’s why I and experienced engineers prefer Lambda Layers.
1. Avoid Code Duplication
You’ve probably seen this. You create 10 Lambda functions, and all of them need the same library like requests or pandas. Without layers, you install that library 10 times. With layers, you install it once and that’s it, that’s done. All functions use it. This saves time, reduces errors, and keeps things organized.
2. Easier Maintenance
This one is huge. Let’s say a library needs an update. Without layers, you must update every Lambda function manually. But, with layers, you update the layer once. All functions benefit. In IT, if it’s easy to maintain, it’s stable!
3. Faster deployments
Uploading a small Lambda function is faster than uploading a heavy one full of libraries. Layers make deployment quicker and smoother. This might really be helpful in cold start wait time, I mean, not directly, but significantly.
How to use layers in a Lambda Function?
Step 1) Launch & Connect to Amazon EC2 instance
The first step we have to do is launch an EC2 instance. In this step, we are launching an EC2 instance because we need a Linux environment to build our Lambda layer, as Lambda functions also use Linux to process Lambda Function logic. Of course, you can do this on your own local Linux machine, but for this practical demonstration, I am using an EC2 instance so that the environment matches AWS runtime properly. I am choosing Amazon Linux 2 because AWS Lambda also runs on a similar Linux environment. This helps avoid compatibility issues later when we attach the layer to Lambda.
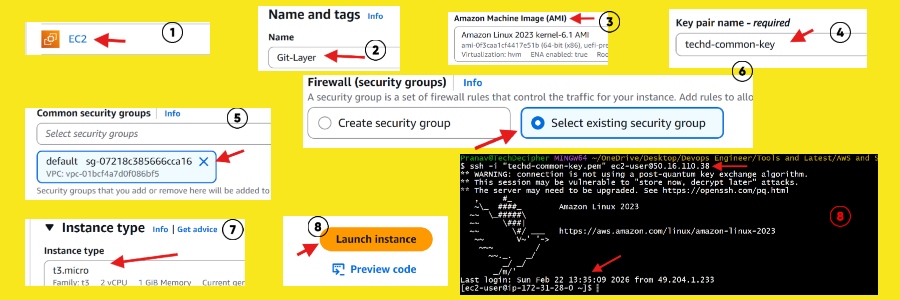
Name the EC2 box, select the Amazon Linux 2023 OS with instance type t3.micro. Also, select the key pair and network settings, and hit the Launch Instance and connect to the EC2 instance. If you do not know how to connect to an EC2 instance, please follow the steps from here.
Step 2) Install Git
Now here is the important part. We are installing Git because our goal is to create a Lambda layer that contains Git. Later, we will use this git layer to run git commands in a Lambda function that needs it. Since the Lambda runtime does not include Git by default, we must manually package Git into a Lambda layer. So we install Git inside EC2 first. We are also installing a zip package because we would need it to zip the layer.
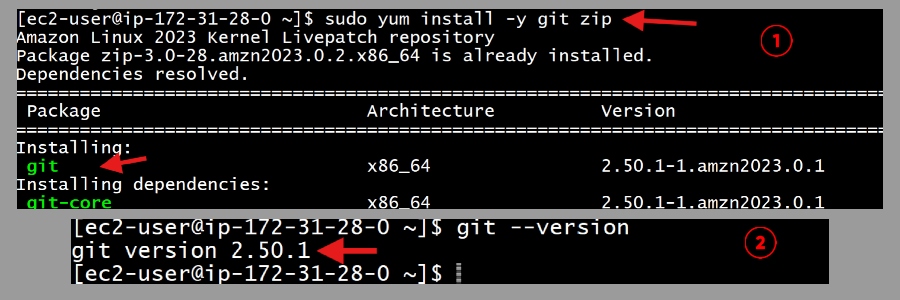
Commands:
git –version
Some Amazon Linux distributions may have some packaged pre-installed like zip, and that’s totally fine.
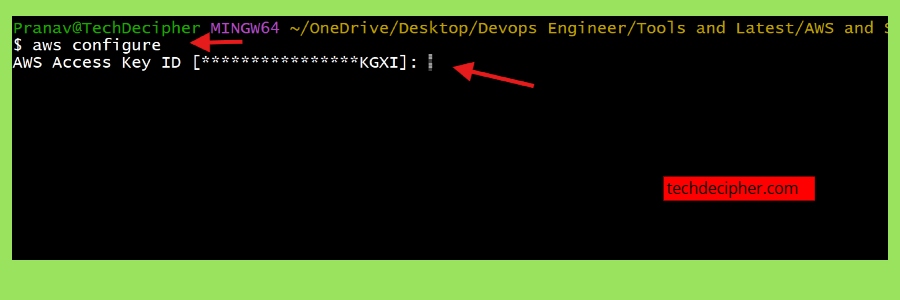
Step 3) install & configure AWS CLI
In this step we would need to configure AWS CLI because we will need this to transfer the layer. The layer that we are going to build in the Linux box which is EC2 instance will be sent to a S3 bucket. You would need to setup a user for the aws CLI access, you can follow how to setup AWS CLI by following the steps here. Generally the Amazon Linux boxes come with AWS CLI pre-installed however if your box does not have it, then follow the steps outlined here.
commands:
unzip awscliv2.zip
sudo ./aws/install
aws –version
Once you have setup the AWS CLI, just follow the steps below.
Step 4) Create folder structure
In this step we are going to build the layer. We will include only what Git needs such as git binary, required git helpers and required shared libraries.
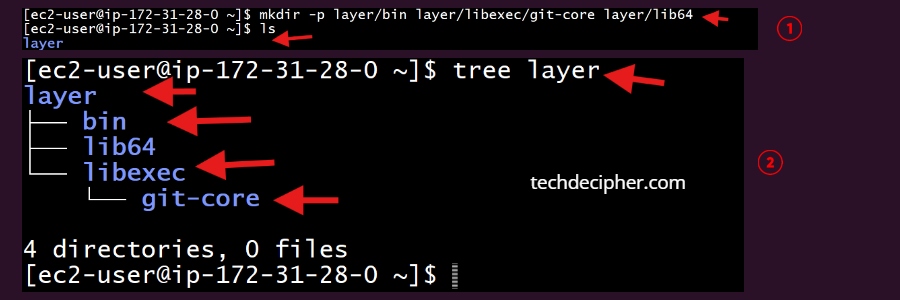
Commands:
ls
tree layer
We are creating the exact folder structure that will contain the components for the Lambda Layer. We create these folders first because we need proper locations to place Git binaries, Git helper tools, and required libraries.
Note: To use tree command you would first need to install it on your machine with the following commands.
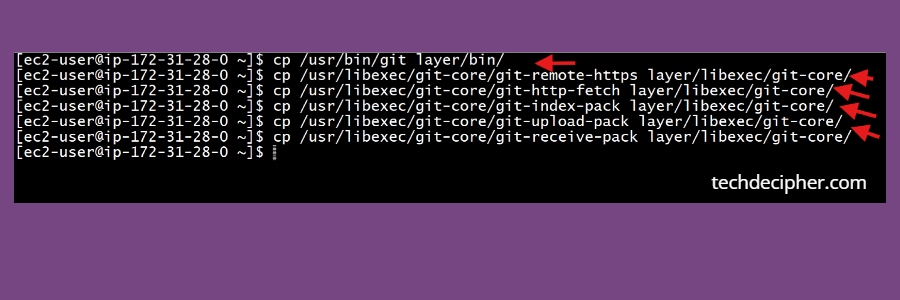
Step 5) Copy helper executables
Now we have to run the following commands one after the other. I have explained why we are doing this post at the end of the commands.
Commands:
cp /usr/libexec/git-core/git-remote-https layer/libexec/git-core/
cp /usr/libexec/git-core/git-http-fetch layer/libexec/git-core/
cp /usr/libexec/git-core/git-index-pack layer/libexec/git-core/
cp /usr/libexec/git-core/git-upload-pack layer/libexec/git-core/
cp /usr/libexec/git-core/git-receive-pack layer/libexec/git-core/
By above steps we copied the main Git binary and its required helper executables into the layer so that Git can fully function inside Lambda. Lambda does not have Git by default, so we must package everything ourselves. These helper files support operations like clone, fetch, unpacking repository data, and push. Without including them, Git commands would fail even if the main Git binary exists.
Step 6) Check shared libraries
In this step we are are using ldd command to check which shared libraries the Git binaries depend on. Then we extracted only the actual library file paths using awk and grep commands.

Commands:
ldd /usr/bin/git | awk ‘{print $3}’ | grep ‘^/’ | xargs -I{} cp -v {} layer/lib64/
We are doing all of this because without these system libraries, Git would fail inside Lambda with missing dependency errors and we don’t want that.
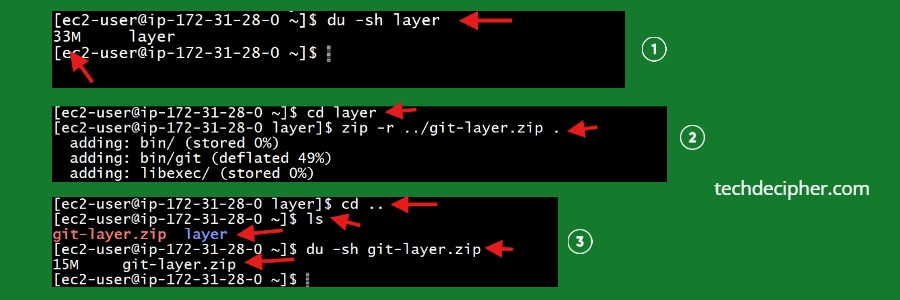
Step 7) Check size of the layer and Zip it
The size of layer after it is unzipped matters a lot. All layers added to a function (up to 5) plus the function code itself must not exceed 250 MB.
So if your layer unzipped and is exceeding this 250 MB qouta, you would not be able to create a layer. So just check with above command and it should be below 250 MB, if not then you need to remove unnecessary libraries again.
Commands:
zip -r ../git-layer.zip .
cd ..
ls
du -sh git-layer.zip
Its time we also zip the layer, goto the actual directory of the layer and run the above command. This command will zip your layer which we can use to upload to Layers section of Lambda Function.
Step 8) Create S3 Bucket & Upload to S3
Goto your AWS S3 Service, and create a bucket if you have not already. You give the Bucket name and leave rest of setting to default and click on Create Bucket.
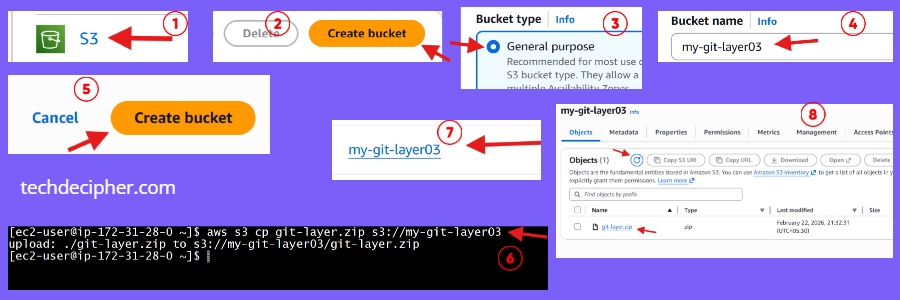
Command:
Once the bucket is created, note down its bucket name and come back to the instance box terminal. And run the above command, which copies the zipped layer ready for the layer deployment. Please replace the bucket name with your bucket name. Once the commands is run, you would see the uploaded file in the bucket.
Step 9) Create Layer in Lambda Function
Now its time we create Lambda Layer, goto your AWS account and visit Lambda service. Navigate to Layers section and click on Create Layer. Name the layer, check the Upload a file from Amazon S3 and select compatible architecture as X86_64 and then provide your url of the layer uploaded in the S3 and click create.
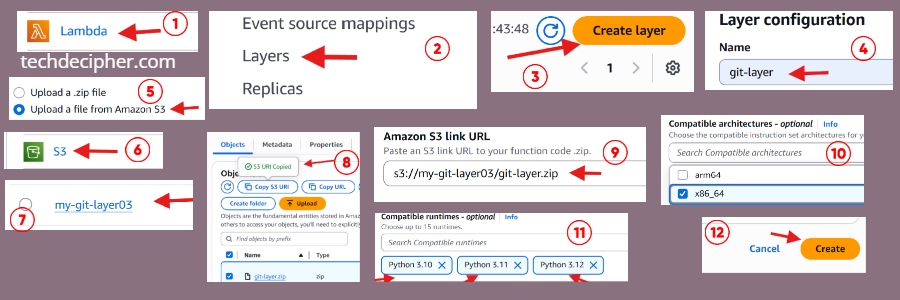
You also need to ensure compatible runtimes, which is a version that is compatible with, in my case the git layer I am setting up is compatible with Python version 10 to 12 so selected those as seen in screenshot.
Step 10) Add Layer to Lambda Function
Assuming your lambda function is running already, now you need to add the layer which is created as part of above step. Goto Functions create one and click on the created function and at bottom you would see add layer. Click on Add layer, then tap on custom layers choose the layer you created and click add.
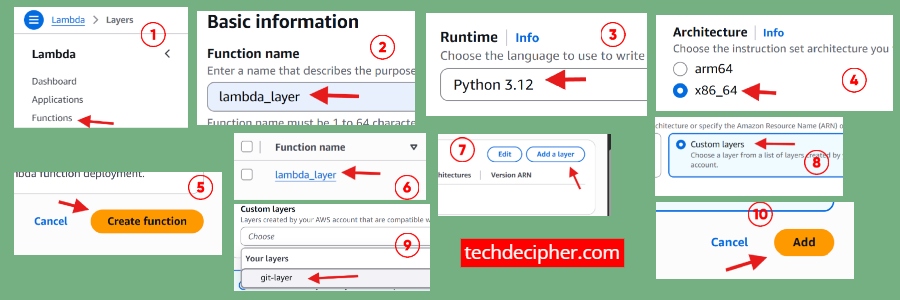
Note: After you click on any function name, the Layer setting is located at the very bottom of Lambda Function, you need to scroll all the way to the bottom for this.
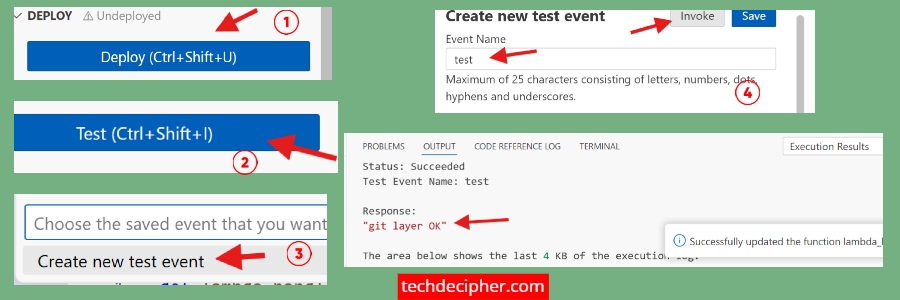
Step 11) Test Layer from Lambda Function
Its time we test the Lambda function to check if the added layer is functional. Right below there is a sample lambda function which you can place to testify the same.
Sample Lambda Code:
def lambda_handler(event, context):
subprocess.run([“/opt/bin/git”, “–version”], check=True)
subprocess.run([“/opt/bin/git”, “help”], check=True)
return “git layer OK”
Add above piece of code in lambda function, click deploy and hit test. That’s it, if you get git layer OK means you have properly configured a git layer in your lambda function.
Conclusion
Lambda Layers might look like a minor feature at first glance. But once you start using them properly, your serverless architecture becomes cleaner, more organized, easier to maintain and most of all, you get to do more with lambda function with layers. From my own experience, the shift from copy-paste dependencies everywhere to structured shared layers felt like leveling up. This concludes how to make use of layers in Lambda function. Have you tried using layers in your AWS projects yet? Do let us know in the comments section below. Are you looking for AWS solution for your static website hosting? then AWS S3 service would be a great fit! check out here for more. We have collection of top class web tools baked right into Techdecipher.com. To go to the tools page, click here. If you need any help or have any suggestions to make, then do reach out via the contact page here. I also provide services to help you with your issues, which you can find here. Happy 228 Memorial Day!