Technology evolves rapidly, and with every innovation comes the need to adapt and learn. You must have heard or have used Terminal in Linux, since it has been modernized, it feels cool to use it to streamline tasks, automate processes, and interact directly with the system. Windows Terminal is Microsoft’s standalone CLI utility that is aimed to provide the same as you do in Linux. Whether you use Linux at your workspace or you barely use Windows for your use case, knowing how Windows terminal functions is always a plus.
In today’s post, we are going to check out what is Windows Terminal, the Difference between Terminal and CMD, why to use the terminal on Windows, how to use a Terminal on Windows, and some tweaks related to it. Without further due, let’s get started!
What is Windows terminal

In the early days, when there wasn’t much scope for Graphical User Interfaces (GUIs), terminals allowed users and developers to enter commands and execute tasks on Linux systems. Over time, many things changed significantly. As a result, the GUI revolution introduced systems with more user-friendly navigation and simpler task execution. Cut to 2019, Microsoft created Windows Terminal to provide a modern command-line experience similar to how the terminal functions in Linux.
Windows Terminal is a container application designed to provide a feature-rich and modern user interface for command-line tools. It is not a standalone shell itself but allows you to run various shells, including PowerShell, CMD, WSL, Azure Cloud Shell, and any other custom shell or CLI tool you configure. It is a powerful tool that modernizes and unifies the command-line experience on Windows, catering to the needs of developers and advanced users.
Difference between Terminal and CMD
Don’t get confused in Terminal and CDM, the below table explains the differences they both have.
| Aspect | >Windows Terminal | CMD (Command Prompt) |
|---|---|---|
| Definition | A modern, feature-rich application that hosts multiple shells (e.g., PowerShell, cmd, WSL). | A legacy command-line interface for executing commands on Windows. |
| Purpose | Acts as a unified interface for multiple command-line tools and environments. | Primarily used for running batch scripts and basic Windows commands. |
| Customization | Highly customizable with themes, tabs, fonts, and colors. | Limited customization; basic appearance with no tabs. |
| Supported Tools | Runs cmd, PowerShell, WSL, Azure Cloud Shell, and custom shells. | Limited to the Command Prompt environment only. |
| Modern Features | Tabs, split panes, Unicode support, GPU rendering, and transparency. | Basic text-based interface with no advanced features. |
Why use Terminal on Windows?
Windows Terminal offers a unified interface and its advanced features, including tabbed sessions, split panes, GPU-accelerated text rendering, and support for Unicode and emojis, significantly improve productivity and ease of use. Additionally, it is highly customizable, allowing users to personalize themes, colors, fonts, and profiles to suit their workflow. With active development and open-source contributions, it stands as a powerful, future-ready alternative to traditional command-line interfaces, bridging the gap between Windows and cross-platform development needs.
How to use Terminal on Windows
In this tutorial, we will explore file management and system management commands using Windows Terminal, with PowerShell as our primary shell. Obviously you can utilize it for many other use cases for example with other shells as shared in step 3.
Step 1) Install Windows Terminal:
If you are using Windows 11, then Windows Terminal comes pre-installed on your system. In this case, all you need to do is go to the search bar, type ‘Windows Terminal,’ and then click Open to launch it. However, it is not available for Windows 7. Therefore, if you are using Windows 10, you will need to download it from the Microsoft Store before you can use it.
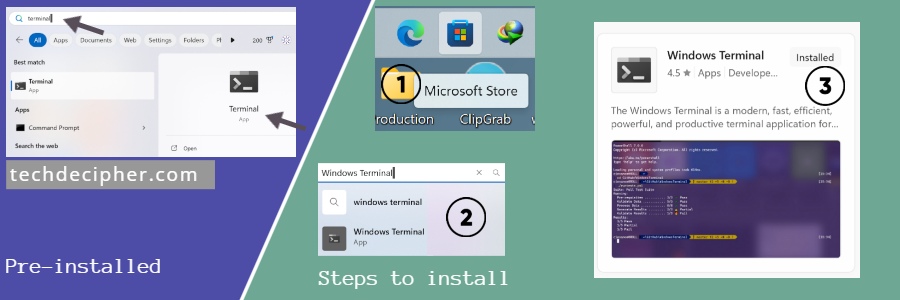
Goto Microsoft Store > Search Windows Terminal > Install > Open as shared in the screenshot above. Skip for step 2 if you have Windows Terminal already installed.
Step 2) Navigation commands [Shell: PowerShell]:
Note: We are using default shell which is PowerShell in Windows Terminal and below commands on this steps represents the same. In further steps we will also change the shell to like Git-Bash and utilize to run Linux commands as shared in step 3.
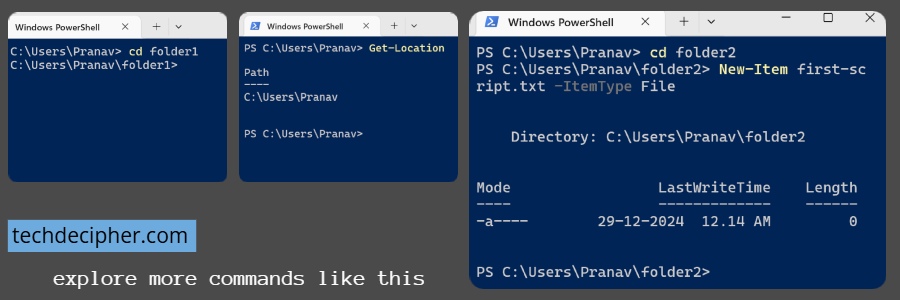
- To create a new Folder: mkdir
- To Change Directory: cd
- To check the present working path: Get-Location
- To create a new File: New-Item filename.txt -ItemType File
That’s how you would go about using PowerShell, feel free to explore PowerShell commands as you like from the link here
Step 3) Change Shell in Windows Terminal
Part 1)
Often times you would need to make use of other shells than PowerShell which is set default on Windows Terminal. To do that, you would need to click on drop down arrow on the pane and then select the ones you need.
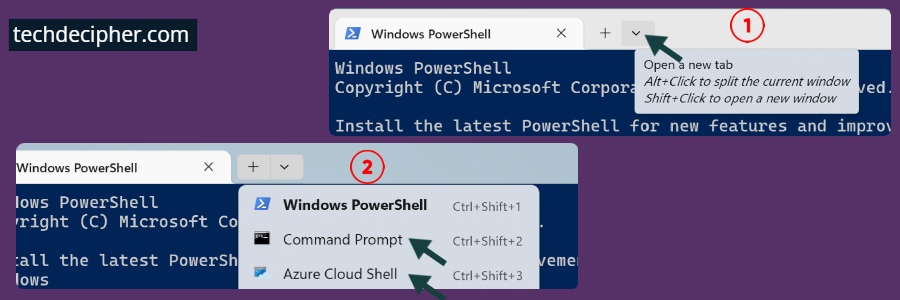
Furthermore, just so you know, you can install many other shells as well in the Windows Terminal, and we are going to setup Git-Bash as shell in this section.
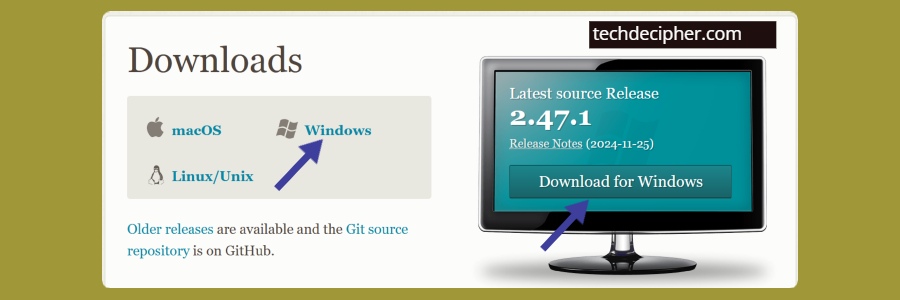
A) Install Git-bash in your windows machine.
Git Bash allows you to run Linux commands on a Windows machine since it provides a Unix-like environment with a Bash shell, thereby emulating a Linux command-line experience within Windows. Therefore, we can install Git Bash on the machine first, and then set it up as a new shell in Windows Terminal by configuring the settings. Please download and install Git-bash from the link here.
Part 2)
B) Open Windows Terminal and go to Settings.
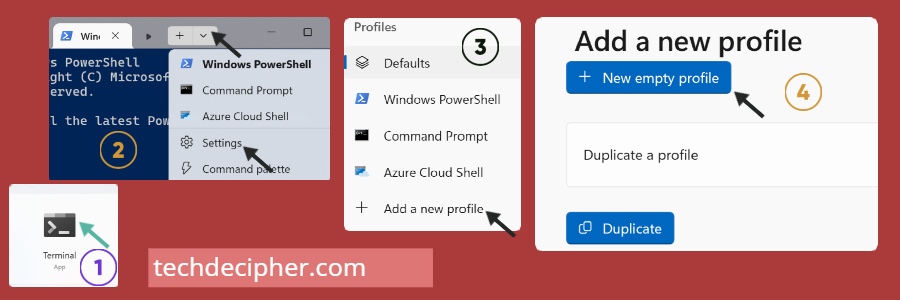
Goto Terminal, and click on settings > Add new Profile > Click on New Empty Profile >
C) Set up the Profile.
This is the section where you setup your actual profile, from here setup the name: GitBash and then Command Line: the actual executable of the shell, and at last setup the Icon which will be shown in the top of the profile. The icon file has to be and ico file so you can download it from here.
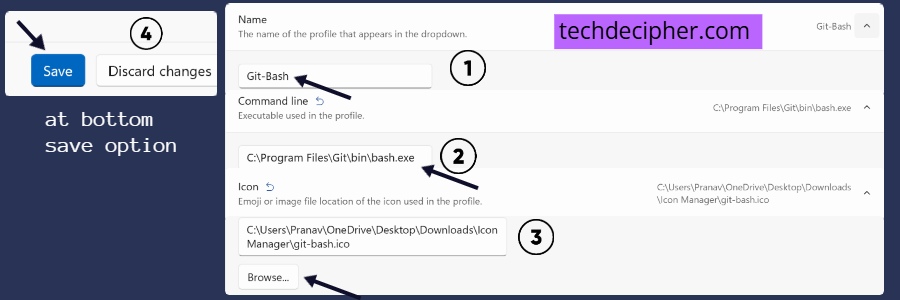
Path of executable: C:\Program Files\Git\bin\bash.exe
Link to ICO: https://github.com/kerol2r20/Windows-terminal-context-menu/blob/master/icons/git-bash.ico
Add the name of the profile in the name section, under the command line put the path of the executable of git-bash and in the icon that you have downloaded, put the path of it in the icon section as shared in the screenshot above. After making the required changes, it’s time to save this profile. The save option is at the bottom so scroll down and hit the save button.
D) Open the new Profile.
As we have saved the new profile, next, it’s time to test it. To begin, click on the drop-down icon on the top pane, and then select the new profile. After that, you will be directed to the new profile with Git-Bash, where you can run Linux commands seamlessly
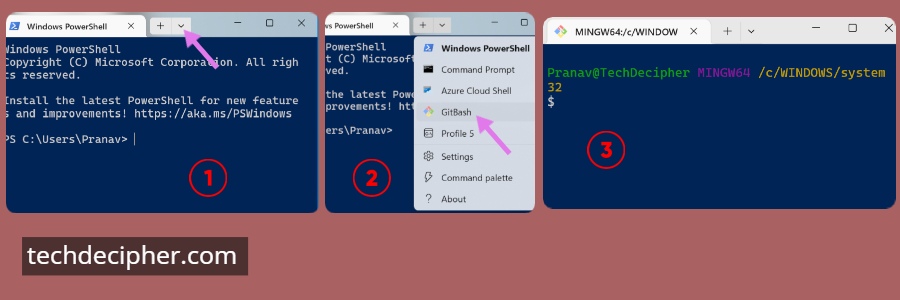
In the following steps, we will see a demonstration of how some Linux commands can be used on Windows Terminal. To get started, follow the instructions carefully, and then observe how the commands behave in this environment.
Step 4) File Management commands [Shell: GitBash]:
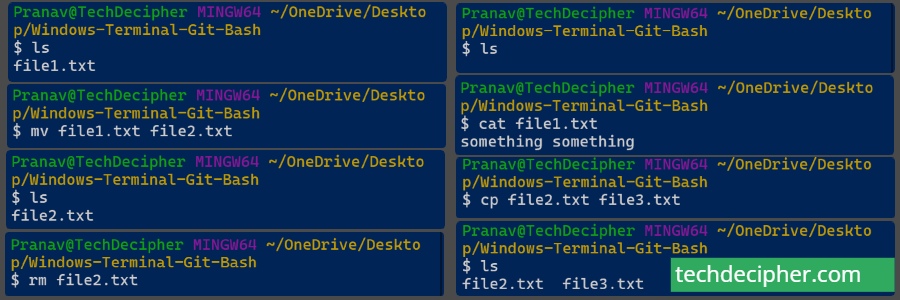
- To view the contents of the file: cat filename.txt
- To move files: mv file-name path
- To copy file cp file-name path
- To remove a file: rm file-name
- To rename a file: mv file-name1 file-name2
- To Edit the file: vim file-name
- To clear the screen: clear
That’s pretty much how you would use file management commands for Linux on Windows Terminal. You can explore many shells and commands just ensure whatever shell you use, the same relevant commands to that shell you are using in it.
Customizing Windows Terminal
Microsoft has developed this Terminal to make it a cool and engaging space where super users and developers can enjoy their experience. In addition, you can tweak settings even further in Windows Terminal, such as changing colors, splitting panes, and more.
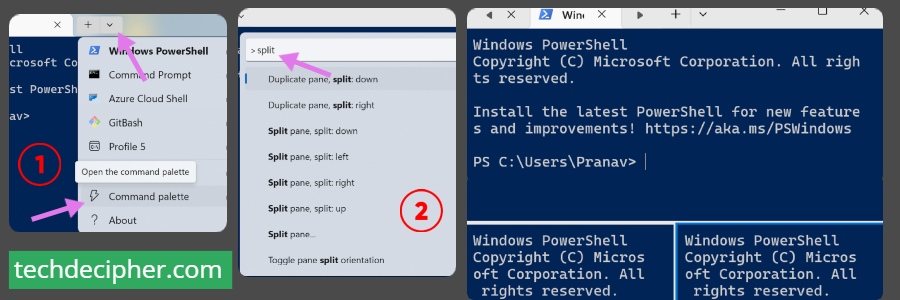
Step 1) Add Tabs and Split Panes
Split the Terminal into multiple panes
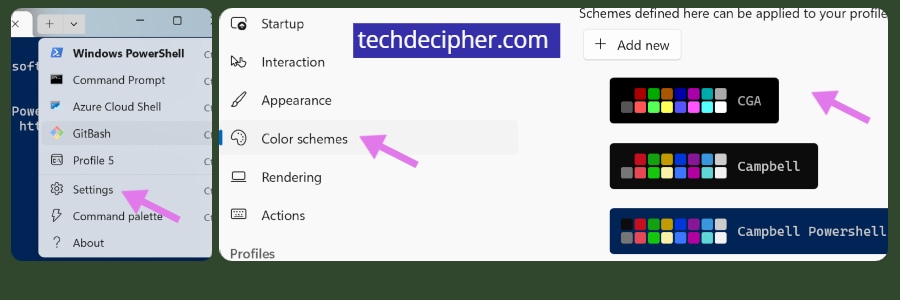
Step 2) Changing the Color Scheme
Step 3) Change Default Profile
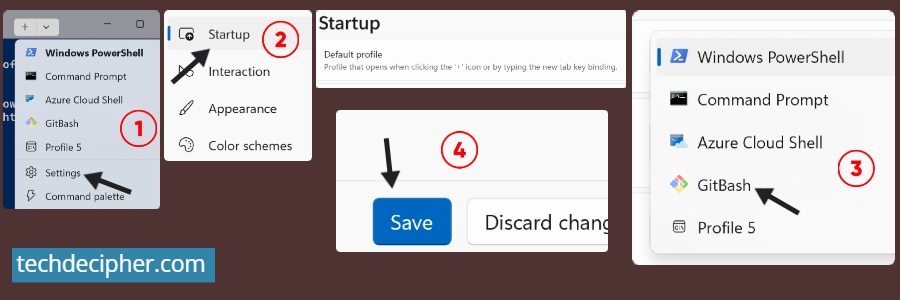
Go to Settings > Startup > and pick the profile you want as default.
Conclusion
Mastering Windows Terminal can open up new possibilities, making it easier to interact with your Windows system and even Linux environments. Whether you’re customizing it for a personalized look or diving into automation scripts, the Terminal is an indispensable tool for modern computing. This concludes How to use Terminal on Windows. Which shell do you like the most and would you prefer Windows Terminal after this? Do let us know in the comments section below. If you need any help or have any suggestions to make, then do reach us via the contact page here. I also provide services to help you with your issues which you can find here. Happy International Mind-Body Wellness Day!


