
I have contributed to many projects, some of them for clients and some for self learning. Most of the CI/CD pipelines I have built were on managed AWS CI/CD pipeline services such as CodePipeline, Jenkins, or GitHub Actions. But when I heard about Harness, it felt like why I hadn’t heard about it earlier. If you are someone who is interested in the CICD pipeline and has never tried it on Harness, then How to build a simple CICD pipeline in Harness is right blog for you.
In today’s post, we are going to check out What is harness? How is it different from other options such as GitHub Actions, CodePipeline or Jenkins? and how to build a simple CI/CD pipeline in Harness. Without further ado, let’s get started!
What is Harness?
Harness CI/CD is a modern DevOps platform designed to simplify how teams build, test, and deploy applications. Instead of stitching together multiple tools, Harness brings CI (Continuous Integration), CD (Continuous Delivery), feature flags, cloud cost management, and monitoring into a single platform.
What stood out to me when I first tried it was how much it reduces manual effort. Traditional tools often require heavy configuration, plugins, or scripting just to get started. Harness, on the other hand, focuses on automation and a cleaner user experience.
How is it different from other options such as GitHub Actions, CodePipeline, or Jenkins?
I have worked with all four, GitHub Actions, Jenkins, AWS CodePipeline and Harness and each one has its own personality. Here’s what stood out to me when I used Harness. When I compared Harness with GitHub Actions, Jenkins, and AWS CodePipeline, the biggest difference I noticed was how organized the pipeline experience feels.
Jenkins is powerful, but it often feels like owning an old SUV. It can go anywhere, but you are also the mechanic. Plugins, updates, scripts, server maintenance there’s always something to babysit. GitHub Actions feels much lighter. If your code already lives in GitHub, it’s super convenient. But after a few workflows, YAML fatigue starts kicking in. One wrong indentation and suddenly your build is throwing errors that make you question your career choices.
AWS CodePipeline is solid if you’re fully inside AWS. But it can feel a bit rigid, especially when your setup involves GitHub, Docker Hub, external tools, or multiple environments. Harness felt different when I switched to it. The visual pipeline flow made debugging easier because I could actually see what was happening instead of jumping between scripts and logs. The connectors also saved time. GitHub, AWS, and Docker Hub didn’t feel like separate pieces I had to glue together manually.
How to build a simple CI/CD pipeline in Harness
Let’s get started building the sample CI/CD pipeline.
Step 1] Sign up and Login Harness Account and create a project.
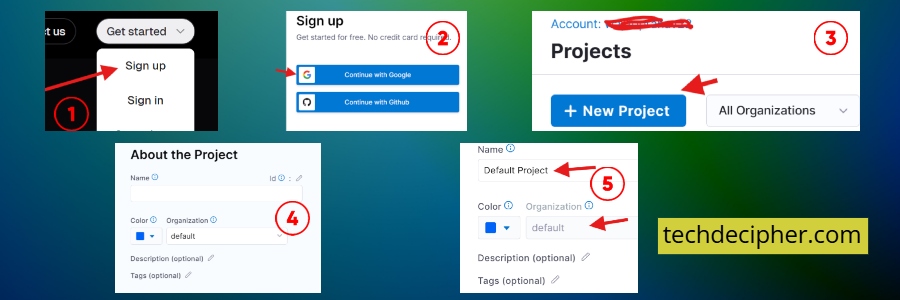
Go to Harness and create your account from the link here. Right after it, you click on Create a Project and Stick to the default settings for now. You don’t need to overthink this part.
Step 2] Create a GitHub repo and add files
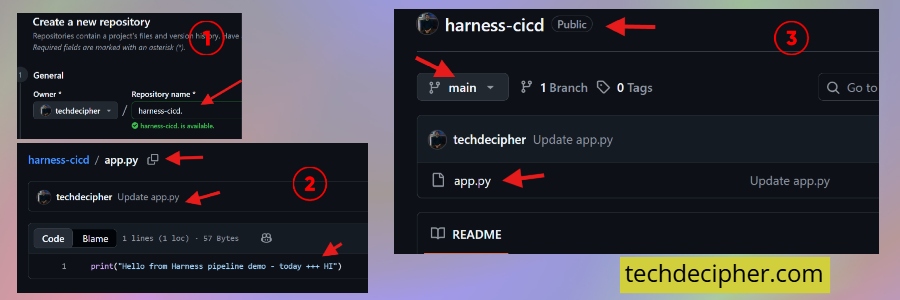
Create a simple GitHub repo with two files, one is app.py, and copy the content shown below the file name.
- app.py
Step 3] Create GitHub connector
To create a GitHub connector in Harness, open the Default Project or whichever project you’re working on, then go to Project Settings and select Connectors. From there, click New Connector, choose GitHub, enter a clear connector name, and continue to the setup page. Next, select the required URL Type and Connection Type, add your GitHub Account URL, provide a Test Repository, and validate the connection. You would also want to put the PAT token of your GitHub account. Add it under credentials, paste your PAT there, and save.

Default projects (or whichever project you work on ) > Goto Project Settings > Go to Connectors > New Connector > Select GitHub > Enter Name > Continue > Fill URL Type > Connection Type > GitHub Account URL and Test Repository. > Credentials > Personal Access Token > New Secrete Text > Secret Name> Secret Value.
Step 4] Create pipeline
Go back to Harness and open the Pipelines section. Click Create a Pipeline, then choose the Inline option so the pipeline configuration is stored directly inside Harness. After selecting this option, click Start to begin creating the pipeline workflow.
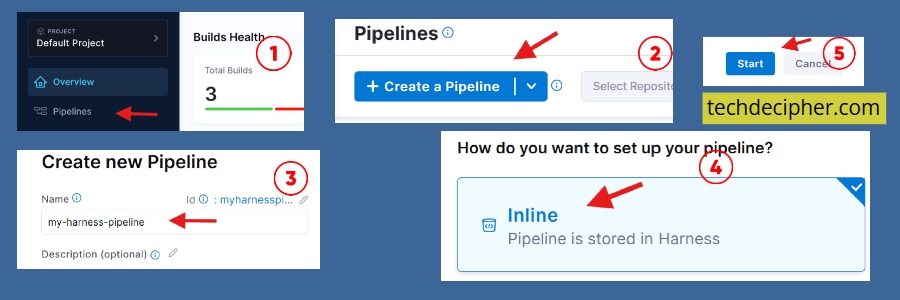
Goto Harness again > Click Pipeline > Click Create a Pipeline > Click Inline ( pipeline stored in Harness ) > click Start
Step 5] Add Stage
Next, add a new Stage to the pipeline and select Build as the stage type. Give the stage a clear name so it’s easy to identify later, then move to the Configure Codebase section. Here, choose Third-party Git Provider, select the GitHub connector created earlier, and enter the repository name that Harness should use for the pipeline.
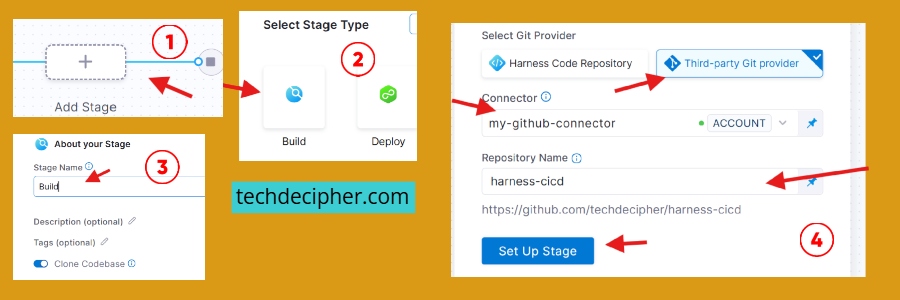
Now, select Stage type > Build > enter stage name > Configure codebase: Third-party git provider > Select the connector you created in the previous step > enter repo name > Click Set Up Stage.
Step 6] Select build infrastructure
In the Infrastructure section, choose where you want Harness to run your build jobs. Select Cloud as the infrastructure type, then choose Linux AMD64 as the platform. For the runtime configuration, the default settings are sufficient for this simple pipeline, so you can proceed by clicking Continue.
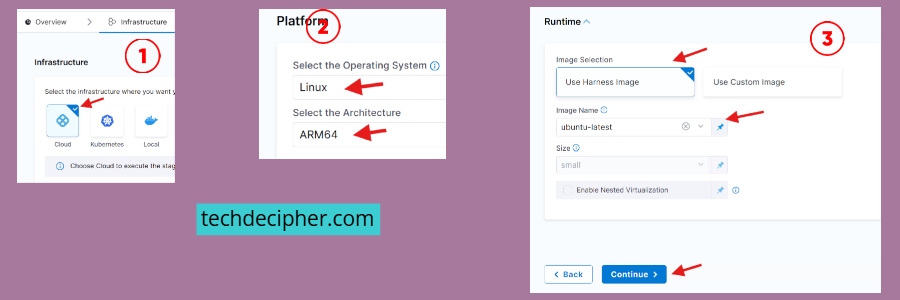
Note: If the Cloud option is not visible, your Harness account may require a one-time verification step. In some cases, completing the initial account verification process enables access to cloud build infrastructure options. If you don’t want to verify yet, then you would need to install delegates, and you can find the steps here to do so.
Step 7] Add clone/codebase
In the Execution section, click Add Step and open the Step Library. Search for Git Clone, select it, and enter a clear step name. Next, choose Third-party Git Provider as the Git provider, add the repository details, and select the build type based on the Git branch you want Harness to clone. Once everything looks correct, click Apply Changes to save the step.
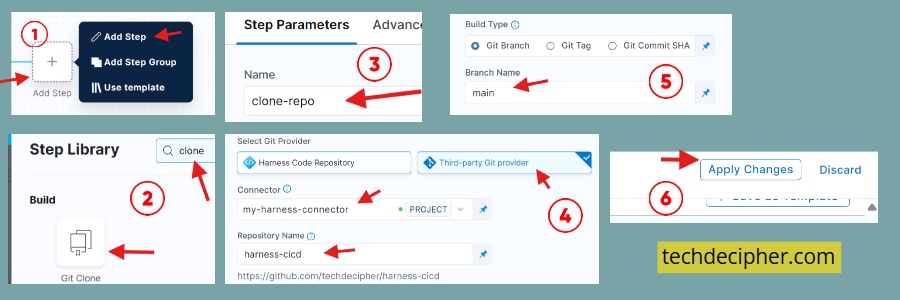
Execution > click add step > Add Step > in Step library search with: git clone click it > enter name > Select Git Provider: Third-party Git provider Repository >
Build Type: your git branch > apply changes
Step 8] Add Run step
This is where your commands go. In the Execution section, click Add Step again and search for Run in the Step Library. Select the Run step, enter a suitable name, and choose sh as the shell type. In the command field, add python app.py, then click Apply Changes to save the step.
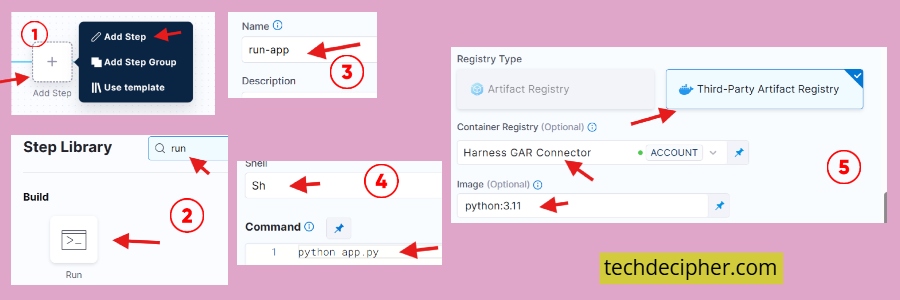
Same in Execution > click add step > Add Step > in Step library search with: run click it > enter name > Select shell: sh > command: python app.py > apply changes
Step 9] Run pipeline manually
To test the pipeline manually, click Run from the pipeline page and choose All Stages. When Harness asks for the Git branch, enter main, then click Run Pipeline to start the execution. Once the pipeline starts, watch the logs carefully to confirm each step is running as expected. That first successful run feels oddly satisfying because it proves your GitHub connection, build stage, and run step are all working together properly.
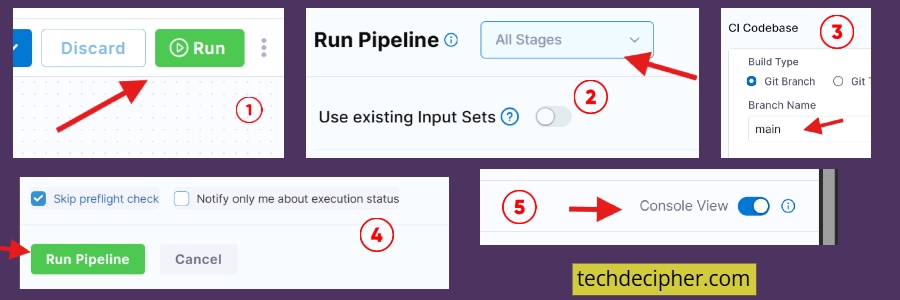
Click Run > All stages > Gti branch : main > Run pipeline >
Also, ensure Console View: enable
Step 10] Automate pipeline using Trigger
Now, let’s make the pipeline smarter by adding a Git trigger. Open the pipeline menu using the three dots, click Edit Pipeline, and go to the Triggers section. Create a New Trigger, select GitHub, enter a trigger name, and choose GitHub as the payload type. Next, select the GitHub connector created earlier, enter your repository name, choose Push as the event, and continue. For the input set source, select the main branch, set the build type as Git Branch, enter main, and create the trigger.
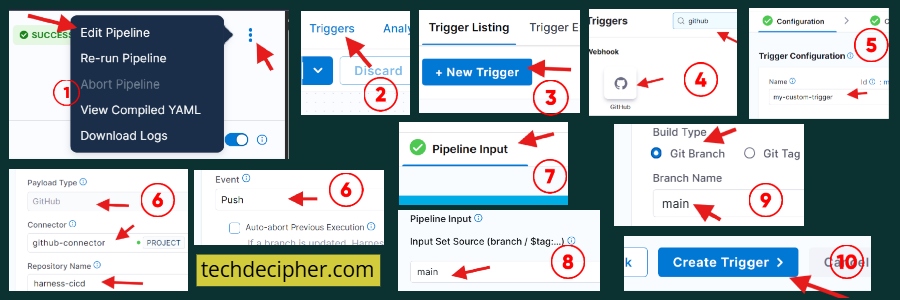
click 3 dots > Edit pipeline > triggers > new trigger > GitHub > Name > Payload Type : GitHub > Connector : the connector which we created in step 3 > Repository Name : your GitHub repo > Event : push > continue > Input Set Source (branch / $tag:…) : main > Build Type Git Branch: main ? create trigger
Step 11] Run pipeline on Git commit
To test the automatic trigger, go to the GitHub repository that contains your application code and make a small change in the app file. After saving the change, push a new commit to the main branch. If the trigger is configured correctly, Harness should automatically detect the new commit and start the pipeline without needing to run it manually.
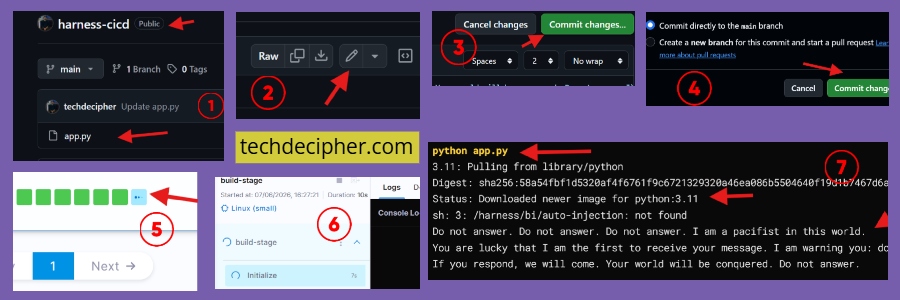
Goto repo > make change > Push a commit >
That’s it, you have just made a harness pipeline yourself that runs automatically when a push is made on your GitHub files.
Frequently Asked Questions (FAQ)
1. Is Harness good for beginners?
2. Do I need Kubernetes to use Harness?
3. Why is my pipeline not triggering automatically?
4. Can I use Harness with private GitHub repos?
Conclusion
If you’ve ever felt that CI/CD tools are harder than the apps you’re building, you’re not alone. Harness doesn’t magically remove all complexity. But it does remove enough friction to make things manageable. And honestly, that’s what most developers need. This concludes How to build a simple CI/CD pipeline in Harness. Which CI/CD tool do you guys use and why? Do let us know in the comments section below. Ever wondered if there can be a vulnerability in CSS? I thought CSS was harmless until it wasn’t anymore. Curious? Grab that here. We have a collection of top class web tools baked right into Techdecipher.com. To go to the tools page, click here. If you need any help or have any suggestions to make, then do reach out via the contact page here. I also provide services to help you with your issues, which you can find here.