
Whether you’re a junior coder, a seasoned DevOps engineer, or someone dabbling in side projects, you’ve likely faced terminal frustrations in Visual Studio. The default CMD or PowerShell just doesn’t cut it for everyone. Then there is Git Bash, a powerful Unix-like shell that brings command-line versatility right into your favorite IDE, like Visual Studio. A lot of us get confused about how we can integrate the GitBash interface on Visual Studio for a better working mindset, because who wouldn’t like to work the way they want, with their favourite tools and setup?
In today’s post, we are going to check out what GitBash is, what is Visual Studio, why integrate git bash with Visual studio and how to integrate git bash with Visual Studio on Windows. Without further due, let’s get started!
What is GitBash?
Git Bash is a command-line shell for Windows that emulates a Bash environment. It’s bundled with Git for Windows and provides Unix-style commands and behavior, which is super handy if you come from a Linux or Mac background — or if you want to learn Git the way it was meant to be used.
What is Visual Studio?
Visual Studio is Microsoft’s flagship Integrated Development Environment (IDE) designed for building powerful applications across platforms — including web, mobile, desktop, and cloud. It supports multiple programming languages like C#, C++, Python, JavaScript, and more. With features like IntelliSense, debugging tools, Git integration, and Azure support built in, Visual Studio is widely used by enterprise and independent developers alike. In short, Visual Studio is not just a code editor; it’s a full-fledged development environment built to boost your productivity.
Why integrate GitBash with Visual Studio?
Before we jump into the how, let’s talk about the why, because when it comes to coding tools, convenience and consistency are everything. Here’s what you gain with Git Bash in Visual Studio:
- Unified Workflow: Keep everything in one window, no context switching.
- Consistency: Git Bash behaves like a Unix shell, which helps if you’re used to commands like ls, grep, cat, etc.
- Smoother Git Experience: Many Git guides (especially on StackOverflow and GitHub) assume you’re using Bash. Now you will be.
- Better Scripting Support: Git Bash supports shell scripts, aliases, and environment setups that Windows CMD or PowerShell simply don’t.
How to integrate git bash with Visual Studio?
Many developers, especially those coming from a Linux or Unix background, prefer using Git Bash instead of PowerShell or Command Prompt. The good news? Git Bash now often comes pre-detected in VS Code, thanks to the integration with Git for Windows. But the real game-changer is setting it as your default terminal — and that still requires a manual tweak.
Step 1) Pre-requisites
Tools that are required for the process.
A) Visual Studio
Download the free Visual Studio Code – Community Edition from the official VS Code website here. Once installed, launch it and accept the license agreement if prompted.
B) GitBash For Windows
Download Git for Windows from git-scm.com or from the direct link here. During installation, make sure to select “Git Bash” as your preferred terminal. Once both tools are installed, you’re ready to move to the next steps.
Step 2) Open VS Code and Access the Terminal
To begin configuring Git Bash as your default terminal in VS Code, first launch VS Code. Then follow either of these two methods to open the terminal:
Click on the “View” menu on the top bar → select “Terminal” Or simply click on the dedicated “Terminal” tab in the toolbar.
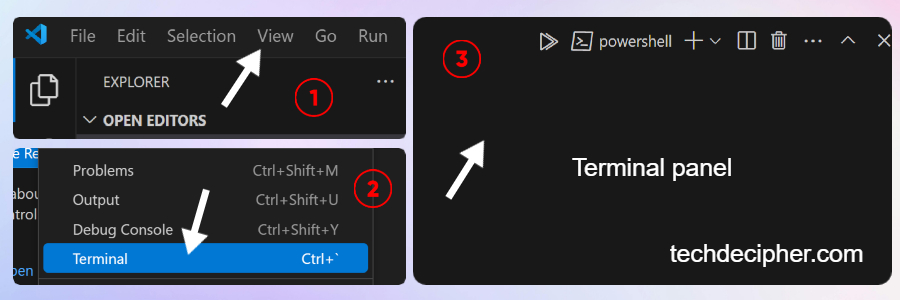
This will open the terminal panel at the bottom of VS Code. You should now be able to see the terminal dropdown next to the + icon — that’s where we head next.
Step 3) Configure Terminal Settings
Now that the terminal panel is open, locate the tiny dropdown icon right beside the + icon at the top-right corner of the terminal section. Clicking it will reveal multiple options, from which you choose: “Configure Terminal Settings” as shown in the 2nd label in the picture below.
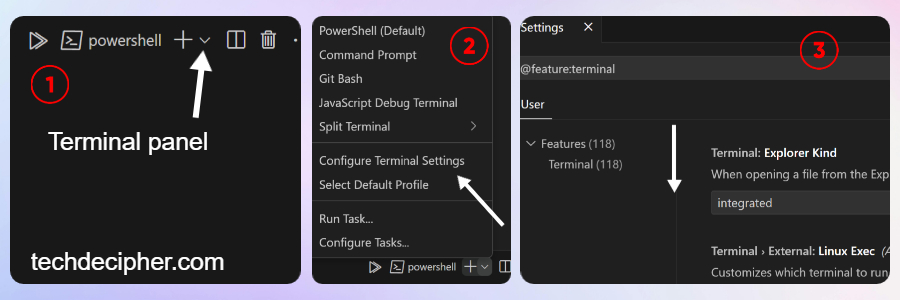
Clicking Configure Terminal Settings will take you directly to the settings section where all terminal configurations are listed.
Step 4) Set Default Terminal Profile
From the listed settings of the Terminal configuration. You would have to look for the settings that reads “Terminal › Integrated › Default Profile: Windows”.
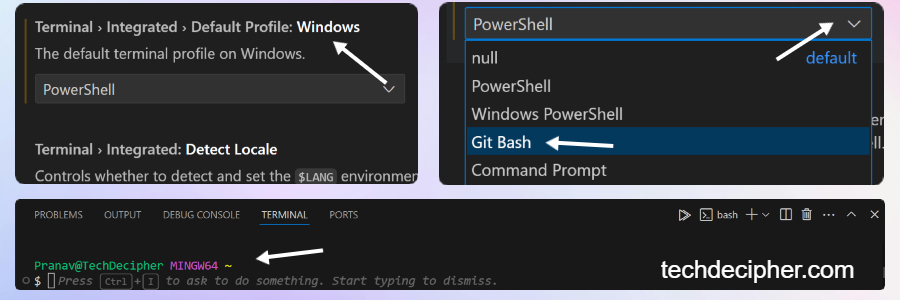
Like shared in the image above. Tap on the selector and choose GitBash from the options. That’s it, now you can open a new terminal session and you will be all set to use GitBash as your default terminal. You may need to close VS Code right after doing this, and start up again to be able to see the integration with GitBash. If you face issues, reach me out here. Have a chilling coding task there, mate!
Conclusion
The goal of using Git Bash inside Visual Studio isn’t just to be fancy. It’s about cutting friction. By integrating Git Bash into Visual Studio, you’re bringing together the best of both worlds — a powerful IDE and a flexible shell — into one workspace. This concludes how to integrate GitBash with Visual Studio on Windows. What alternative to IDE and command-line shell do you use in your workspace? Do let us know in the comments section below. If you need any help or have any suggestions to make, then do reach us via the contact page here. I also provide services to help you with your issues, which you can find here. Happy Christopher Street Day!