
Auto-SSL is one of the integrated SSL feature format getting popular now for Linux based hosting. Website hosting providers are now adding integrated SSL as a feature for easing out the SSL installation pain. Though the level of complication has decreased, there is still few proper steps one needs to follow.
Today in this post, we are going to check out, little brief about auto SSL, who provides it and how to install SSL or issue it for Auto-SSL supported hosting plans. So without decrypting the encryption, lets begin.
What is an Auto-SSL?
Auto-SSL is nothing but an automated SSL issuance or installation feature which is mounted on your hosting plan by your hosting provider. cPanel Inc, introduced Auto-SSL feature in cPanel |WHM version 58 back in 2016. For most of the time, a hosting plan comes up with the Auto-SSL feature in it, which you can consult with host providers before purchasing the hosting plan. You may often be given the options to upgrade the hosting plan. When it comes to SSL certificates for websites, we need to understand their types. There mainly are 3 types of SSL certificates, and they are as follows.
- Extended Validation (EV)
- Organization Validation (OV)
- Domain Validation (DV)
To maintain the ease of the post, we wouldn’t go in details about the usage per SSL certificate type which you can also read about it here. Now Auto-SSL is a DV type of SSL certificate. A DV SSL is a domain validation SSL which requires a validation of your domain, and issued in much less time as compared to OV or EV SSL certificates.
Different Auto-SSL providers
The default Auto-SSL provider in cPanel licensing is Sectigo. Again Sectigo is the market leader which bonds with cPanel Inc and has agreed to work intact. This is the main reason why Sectigo is the default Auto-SSL provider. One can change the Auto-SSL provider to Let’s Encrypt if they own the server. You can find the document on how to do that in the article here.
How to issue an Auto-SSL certificate ?
The test subdomains that we are performing Auto-SSL installation is on serveradmin.techdecipher.com and www.serveradmin.techdecipher.com. So according to common parameters we need to begin as follows.
Step-1) Ensure the domain in question is pointing to your hosting IP
Kindly visit Whatsmydns.net and input the domains in question to verify whether the domain is pointing to hosting IP or not.


As you can see the subdomain serveradmin.techdecipher.com is pointing to hosting IP but not the www.serveradmin.techdecipher.com version of subdomain name. So here I will update the domain DNS of techdecipher.com to update for www subdomain. Note that any DNS update might take 24 to 48 hours.
Step-2) Ensure the domain in question has no CAA or AAAA records in DNS
The CAA and AAAA records forbid sectigo from issuance of new SSL certificate through Auto-SSL . Please navigate to Whatsmydns.net as in step 1) and select the CAA record from the selector and check. Do the same for AAAA with respect to domain names in question.

If you find CAA or AAAA records in the domain DNS, it is going to prevent SSL issuance. It is suggested that you remove it from your DNS and wait for the DNS propagation timeframe which might take 24 t0 48 hours.
Step-3) Exclude all domains and include the ones you want to issue one by one
Kindly navigate to cPanel Admin >> SSL/TLS (Status) >> to be able to include or exclude.

In above screenshot we have excluded all subdomain names except serveradmin.techdecipher.com and www.serveradmin.techdecipher.com. Lets suppose if the domains are not included, you would need to include it.
Step-4) Remove self-signed certificates in the hosting for at least that domain
Kindly navigate to cPanel Admin >> SSL/TLS >> CERTIFICATES (CRT) to be able to remove self-signed certificate.

Self-signed certificates are not great for production websites or servers, and is intended for lab environment. Self-signed certificates can prevent install of an auto SSL certificates.
Step-5) Uninstall expired or self-signed certificates from manage SSL section
For this, navigate to cPanel Admin >> SSL/TLS >> Manage SSL sites (INSTALL AND MANAGE SSL FOR YOUR SITE (HTTPS)) to be able to uninstall expired or self-signed certificates.

If the expired or self signed certificate exists, it is going to complicate the process so better to get rid of it.
Step-6) Disable control file
This is rare to happen which is why we put this at bottom. If you have tried all the above steps and waited for it to install then you might want to follow this option.
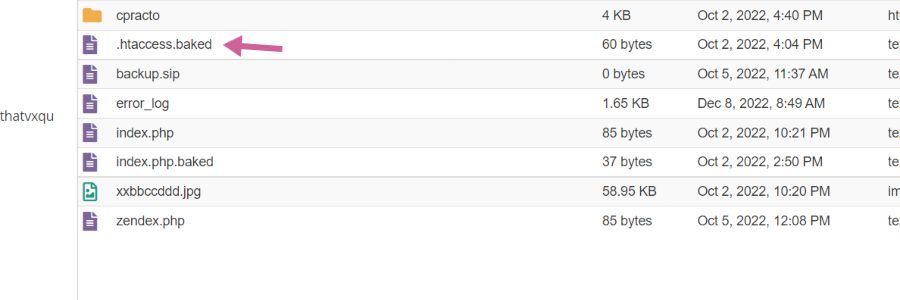
This is optional however we have seen in some cases the control files such as .htaccess or .user.ini or even the content could prevent from issuing an Auto-SSL certificate. Here in this option we have disabled the control file and also sandboxed the whole content.
Step-7) Give some time!
When you have followed all above steps up to 6th, and yet the Auto-SSL is not issued worry not, it is going to be issued sooner. We suggest that you leave up to the Sectigo which is Auto-SSL provider for your hosting. This might take 24 hours for them to issue certificate and is normal timeframe. You also not question hosting providers about it since they are not the one who are managing it. It is the Sectigo.com who is managing it for your hosting plan. This also does not mean that you take upon Sectigo.com about the issuance, it is an automated process. If you follow above 6 steps, we are sure under 24 hours the Auto-SSL will be issued. Below is the result of our steps

Step-8) Restart the Auto-SSL service for user. (Root required)
In case If you own a server with WHM control panel and still have been facing issues with issuing Auto-SSL for a particular user. Then this is the step you must follow. The trick here is to restart the service for that particular user where the domain in question is hosted.

Kindly login to your WHM>> Manage Auto-SSL >> Manage Users >> Search the User in there. When you have located the user, click on Disable Auto-SSL and then switch to Enable Auto-SSL. This way the process of SSL for that user will be enabled for more effect. This can be also achieved via SSH if you do not have WHM control panel by following steps here.
Conclusion
We have reviewed about the Auto-SSL and how to install it, this concludes how to issue an Auto-SSL. Do let us know in the comments below if you successfully got the SSL certificate issued. If you own a Server or a shared hosting and having issues in getting Auto-SSL issued, you can reach out to us for any help here. Have a great time ahead!


One Response
helpful information for learner great sir