
Let’s be honest, cloud security can feel a bit complex. You do want to give access to the right folks, and only them, but you don’t want to leave the gate wide open. That’s where a Bastion Server comes in. If you’ve been poking around AWS trying to figure out how to let your team access private EC2 instances without exposing them to the entire internet, you’re in the right place. I bring how to create a bastion Server in AWS so you don’t have to struggle.
In today’s post, we are going to check out what is Bastion Server is, why it matters, its architecture, and how to create a bastion server. Without further ado, let’s get started!
What is Bastion Server?
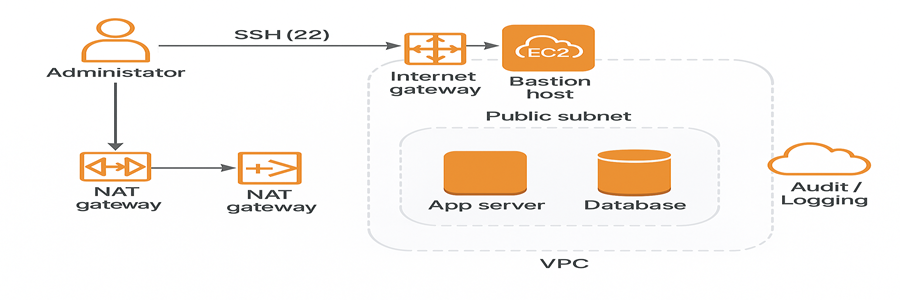
A Bastion Server, sometimes called a “jump box” or “Bastion Host”, is like the gatekeeper of your environment. It sits out front, in a public subnet, while all your precious servers are tucked away safely in private subnets. The only way to access Bastion servers is via SSH, that’s exactly what makes it secure. Instead of opening up your entire VPC to the internet, you open a small, well guarded door. You SSH into the bastion, then from there, you hop into your private instances. No need to expose every server, just protect one. Simple idea. Big security boost.
Why a Bastion Server Matters?
- Reduces attack surface: Instead of exposing every server, you expose exactly one (or none, with SSM). That’s a huge win.
- Auditable access: Session logs, IAM policies, and CloudTrail tell you who accessed what, when, and how. Incident reviews stop being guesswork.
- Least privilege: You control inbound rules to the bastion and allow SSH (or SSM) from it to private instances nothing else.
- Operational sanity: Centralize access rules, rotate fewer keys, and standardize how engineers reach internal resources.
Architecture of Bastion Server
How to create a bastion Server
Step 1 – Create the VPC
VPC (Virtual Private Cloud): A VPC is your own private network inside AWS. Think of it as a virtual data center where you can launch servers, control IP ranges, and manage how resources talk to each other securely.
Log in to AWS Console → Navigate to VPC Service → Click Create VPC.
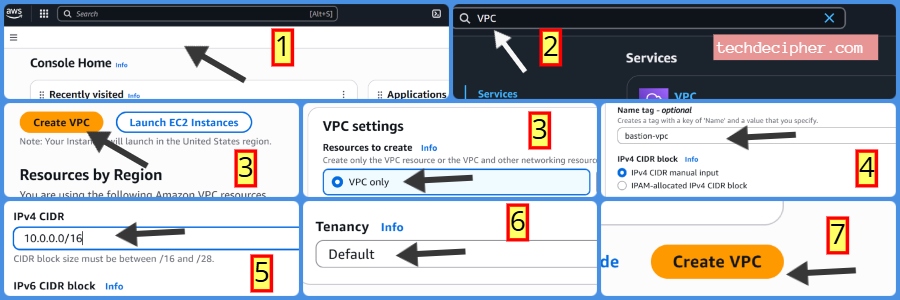
- Under VPC Settings: VPC Only
- Name: bastion-vpc
- IPv4 CIDR Block: 10.0.0.0/16 (this gives you plenty of private IPs to create subnets later).
- Tenancy: Default (keeps it cost-effective and simple).
Finally, click Create VPC. This VPC acts as your isolated network in AWS, where you’ll place both the Bastion server that is public facing and your private servers.
Step 2 – Create Subnets
Subnets: Subnets are a range of IPs within your VPCs.
Public Subnet: A subnet inside your VPC that allows you to connect to the internet (via an Internet Gateway). Resources can be placed here, like a Bastion host, which can be accessed from outside.
Private Subnet: A subnet that has no direct internet access. It’s where you keep sensitive resources (like databases or app servers) safe, only accessible via the Bastion server or internal communication.
We’ll create two subnets inside our VPC, one public (for the Bastion host) and one private (for internal servers).
1] Public Subnet
Go to Subnets → Click Create Subnet.

- Select VPC: bastion-vpc.
- Name: public-subnet
- Availability Zone (AZ): us-east-1a
- CIDR Block: 10.0.1.0/24
Click Create Subnet.
2] Private Subnet
Repeat the same process.

- Select VPC: bastion-vpc.
- Name: private-subnet
- Availability Zone (AZ): us-east-1a
- CIDR Block: 10.0.2.0/24
Click Create Subnet. Now you have a clear separation. The public subnet is for external access to Bastion, and the private subnet is for secure internal resources like databases or app servers.
Step 3 – Internet Gateway & Routing
Internet Gateway (IGW): A doorway that connects your VPC to the internet. Without this, no resource in your VPC can talk to the outside world.
Route Tables: Rules that decide how network traffic flows. For example, public subnet routes traffic to the IGW for internet access, while private subnet routes stay internal.
Public Route Table: A route table that sends traffic to the Internet Gateway, allowing internet access for public subnets.
Private Route Table: A route table without an internet route — traffic stays internal to the VPC for private subnets.
Now we’ll connect our VPC to the internet and set up routing rules for both public and private subnets.
Create Internet Gateway
Go to Internet Gateways → Click Create Internet Gateway.
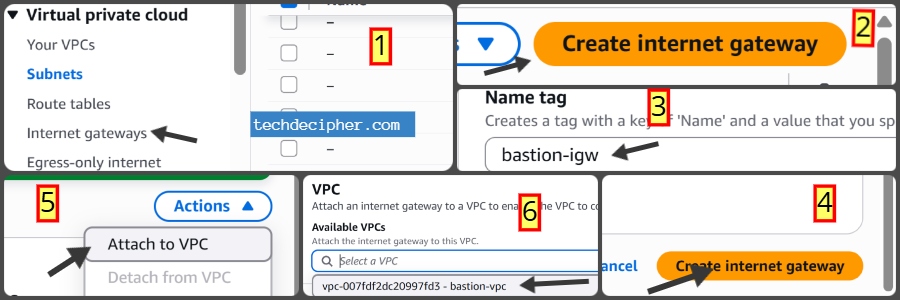
- Name: bastion-igw
Click Create and then Attach to VPC → select bastion-vpc.
Public Route Table
Go to Route Tables → Click Create Route Table.
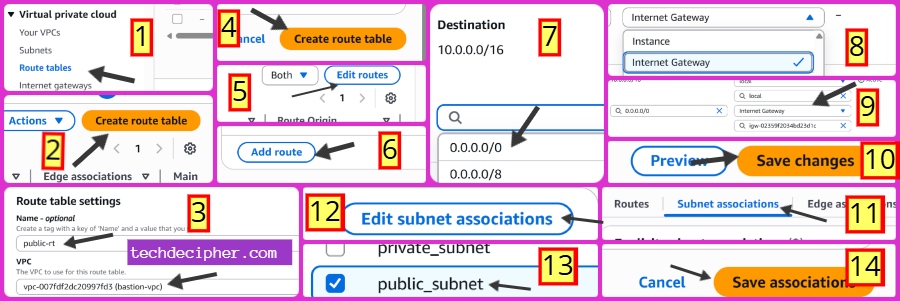
- Name: public-rt
- VPC: bastion-vpc
Click Create.
Open the route table → Routes → Edit Routes → Add Route:
- Destination: 0.0.0.0/0
- Target: Internet Gateway → bastion-igw
Save routes.
Go to Subnet Associations → Associate with public-subnet.
Private Route Table
Create another route table →
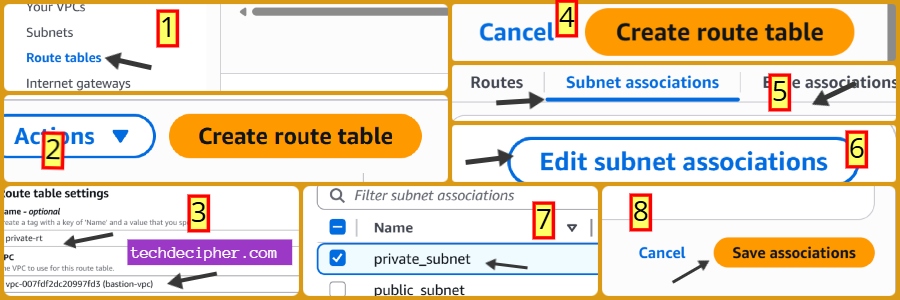
- Name: private-rt,
- VPC: bastion-vpc.
- Leave the default local route only (no internet access).
- Associate with private-subnet.
With this setup, your public subnet can access the internet (through the IGW), while your private subnet stays fully internal and isolated.
Step 4 – Create Security Groups
Security Groups act as firewalls for your instances. We’ll create two, one for the Bastion host and one for the private servers.
Bastion SG
Go to Security Groups → Click Create.
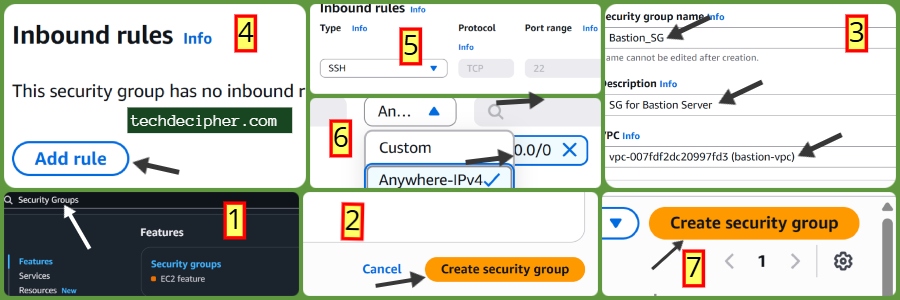
- Name: bastion-sg.
- VPC: bastion-vpc.
Add Inbound Rule:
- Type: SSH (22)
- Source: Your public IP (check from whatismyipaddress.com).
Save.
Private SG
Create another SG:
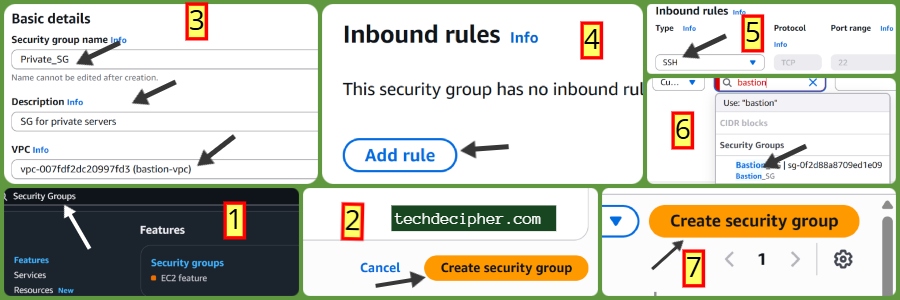
- Name: private-sg
- VPC: bastion-vpc.
- Add Inbound Rules: SSH (22): Source → bastion-sg (choose by SG ID, not IP).
Save.
With this setup, only your IP can reach the Bastion, and only the Bastion host can reach private servers. This keeps your internal resources safe from the internet.
Step 5 – Launch Bastion Host
Now we’ll launch the Bastion server in the public subnet.
Go to EC2 → Click Launch Instance.
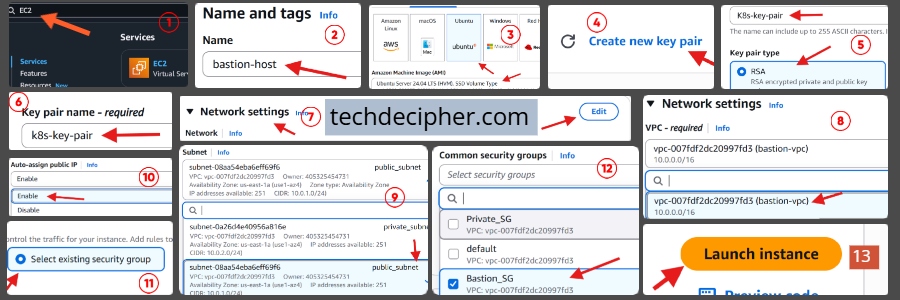
- Name: bastion-host
- AMI: Ubuntu Server 24.04 LTS (HVM)
- User: ubuntu
- Instance type: t3.micro (free-tier eligible, good for testing).
- Key-Pair: Create new Key Pair
Network Settings:
- VPC: bastion-vpc
- Subnet: public-subnet
- Auto-assign Public IP: Enable (so you can SSH from your machine).
- Security Group: bastion-sg
- Key Pair: Create/select one and download the .pem file for SSH access.
Click Launch.
This Bastion Host acts as the secure “jump box”. You’ll first SSH into it, and from there you can connect to any server inside the private subnet.
Step 6 – Launch App Servers
Now let’s place our actual workloads (App + DB) in the private subnet. These won’t have public IPs, so they’ll only be reachable via the Bastion host.
App Server
Go to EC2 → Launch Instance.
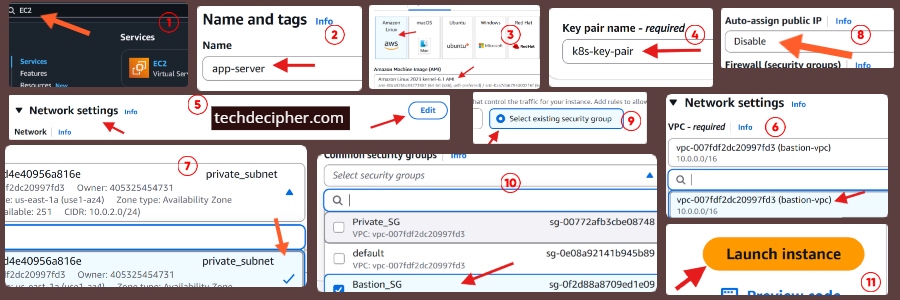
- Name: app-server
- AMI: Amazon Linux 2
- User: ec2-user
- Instance type: t3.micro
- Key Pair: Use the same key pair as Bastion.
Network Settings:
- Subnet: private-subnet
- Auto-assign Public IP: Disable
- Security Group: private-sg
Click Launch.
At this point, your app server is safely tucked away in the private subnet. It can’t be accessed directly from the internet, only through the Bastion host.
Step 7 – Push Key Pair to Bastion Host
To access private servers from the Bastion, you’ll need the key pair file (.pem) available on the Bastion host itself. We’ll securely copy it from our local machine. By this time, you already have your Private key downloaded as a result of launching the bastion host from step 5.
Open Git Bash / Terminal on your local system and navigate to the folder where you have downloaded the private key.
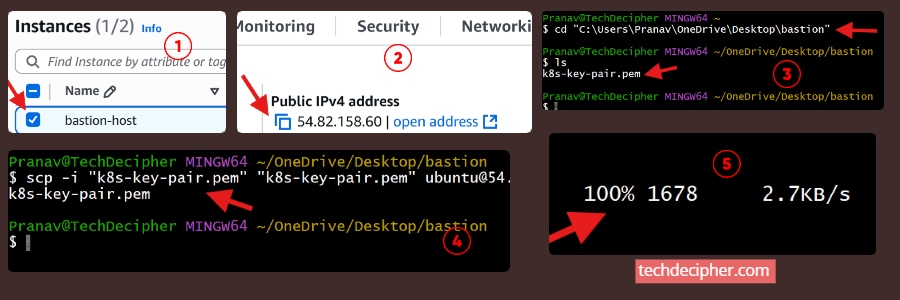
Run the following scp command (replace paths and Bastion IP as needed):
This command copies .pem key file to the Bastion host under /home/ec2-user/.ssh/. Once successful, you’re ready for Step 8 – SSH into Private Servers through Bastion. Without this step, the Bastion won’t have the credentials required to connect to private instances.
Step 8 – SSH into Private Servers through Bastion
Now let’s verify the complete SSH flow — from your laptop → Bastion Host → Private servers.
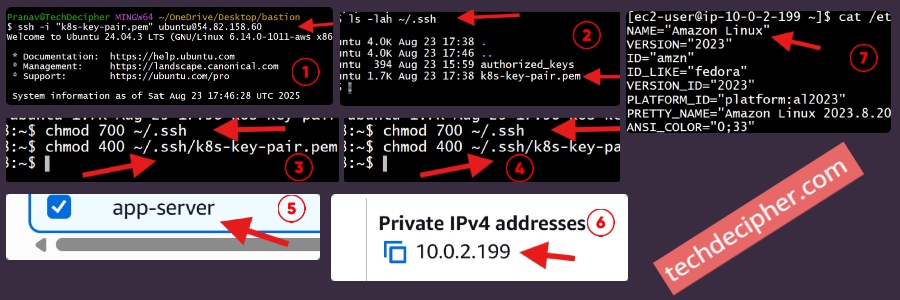
Connect to Bastion Host (from your local machine)
Fix Permissions on Bastion Host
Once inside the Bastion, set the correct permissions for the uploaded key:
SSH into App Server (from Bastion)
Note: Replace private IPs with your actual App server private IPs.
At this point, your flow is working: you can log into the Bastion Host (public subnet) and then securely “hop” into your App servers (private subnet). This is how you would set up a bastion server to securely access your app or db servers.
Conclusion
Setting up a bastion server in AWS isn’t about just spinning up another EC2. It’s about creating a secure, reliable doorway to your infrastructure. If you follow these steps, you will be able to create a bastion that’s both approachable and robust, ensuring your infrastructure or private EC2s stay away from public access. This concludes How to create a bastion Server in AWS. Do you use a different type of Bastion Server Solution in your Company? Do let us know in the comments section below. A few years ago, I published a blog about how to access EC2 instances in AWS. Check the blog here for more. If you need any help or have any suggestions to make, then do reach out via the contact page here. I also provide services to help you with your issues, which you can find here. Happy Popular Consultation Day!