
You are working on a project as a freelancer, or you are a full time Cloud/DevOps Engineer, if you lose the PEM file, you might face challenges in connecting to the Server or Bastion Server. Losing the PEM file for an EC2 instance can feel like losing the only key to your server. Your application may still be running, but when you need to connect through SSH, the private key is nowhere to be found.
The good news is that you may still have another way in. If AWS Systems Manager Session Manager is configured for the instance, you can open a terminal session and add a replacement SSH public key. You cannot retrieve the original private key from AWS. What you can do is restore SSH access using a new key pair.
In today’s post, we are going to check out how to recover EC2 SSH access using AWS SSM, how to create a replacement key safely, and what to check if the connection still fails. Without further ado, let’s get started!
What is a PEM key file?
A PEM file is a text-based file commonly used to store cryptographic keys and certificates. PEM stands for Privacy-Enhanced Mail, although today the format is widely used for server authentication, SSL/TLS certificates, and cloud services such as AWS. In AWS, you will commonly encounter a .pem file when creating an EC2 key pair. AWS gives you the private key, which can be used to authenticate when connecting to an EC2 instance.
Imagine you rent a locker and receive a special key that can open it. The locker represents your server, while the key represents the PEM file. For example, when you create an AWS EC2 server, AWS can give you a file called my-server-key.pem. You keep this file on your computer and use it when connecting to the server. The server checks whether your key matches the one it trusts. If it matches, you are allowed to connect.
So, in simple terms, a PEM file works like a digital key that proves you are authorized to access a server. Just like you would not give your house key to a stranger, you should never share your private PEM file with anyone. There are various other keys used in the technology domain, to know more about them in detail and the differences between them, click here.
What do you need before starting?
This guide covers Linux EC2 instances that you own or are authorised to administer. Session Manager needs a running SSM Agent, appropriate instance permissions, permission for your AWS identity to start a session, and connectivity to the required Systems Manager endpoints. Simply having an EC2 instance listed in the console does not guarantee that Session Manager will work. AWS has the pre-req document for AWS Session Manager prerequisite, you can review it here.
You also need OpenSSH on your local computer to run ssh and ssh-keygen to do that, you can either refer to this blog, or you need to install GitBash.
The examples below use Amazon Linux, whose usual login account is ec2-user. For an Ubuntu instance, use ubuntu instead.
How to recover your PEM file?
Step 0) The problem?
It’s a normal day, and you are trying to log in to your production server, and bam, you can’t get in. Because you just lost the PEM file as an admin, or there could be an issue with it, or the PEM file is corrupted, and you are unable to get into the EC2 instance.
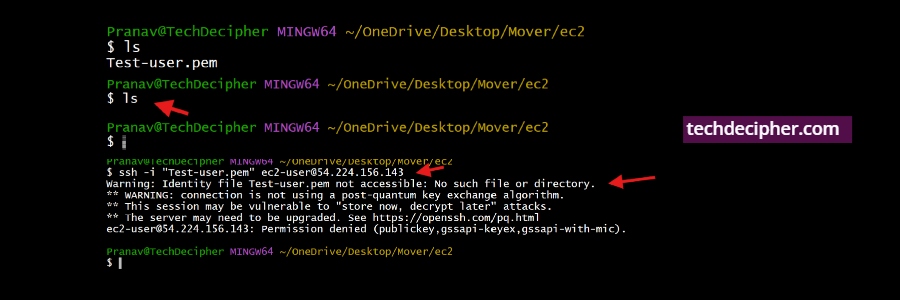
Trying to access it using SSH is not working, as shown in the screenshot above. To solve this, the following steps will help us achieve it.
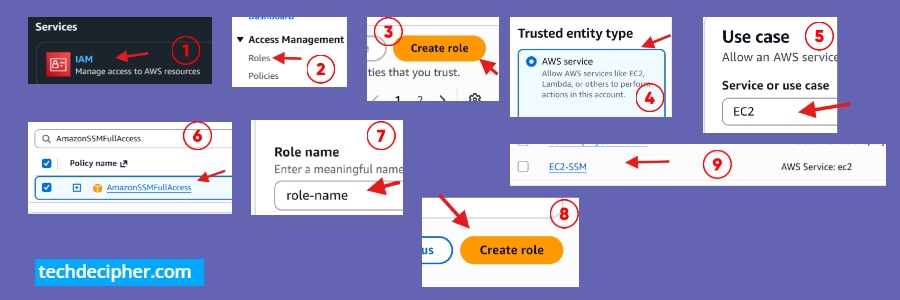
Step 1) Attach an IAM Role to the EC2 instance first
To allow the EC2 instance to communicate with AWS Systems Manager, first create and attach an appropriate IAM role. Open the IAM Service and navigate to Roles, then select Create role. Under Trusted entity type, choose AWS service, and for the Use case, select EC2. Continue to the permissions step and attach the AmazonSSMFullAccess managed policy, which provides the permissions required for the SSM Agent to communicate with Systems Manager. Click Next, enter a suitable name for the role, and select Create role.
Once the role has been created, return to the EC2 console and select the required instance. Go to Actions → Security → Modify IAM role, choose the IAM role you just created, and click Update IAM role. Once the role is updated, you would need to reboot the instance for the role to take effect.
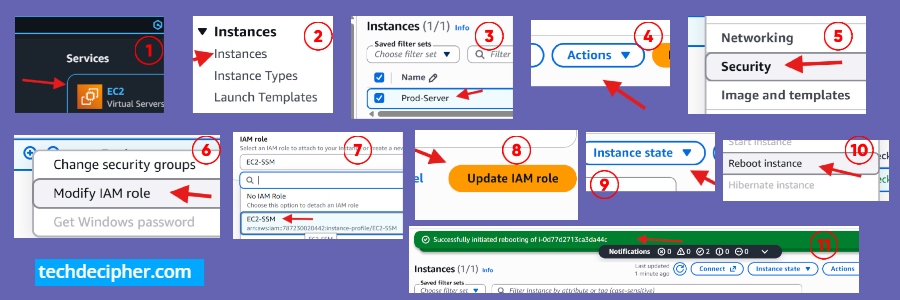
Step 2) Connect to Your EC2 Instance Through Session Manager
To connect to your EC2 instance using AWS Systems Manager (SSM), open the AWS EC2 Service and navigate to Instances. Find and select the EC2 instance you want to access, then click Connect at the top of the page. On the connection screen, choose Session Manager as the connection method and click Connect. AWS will open a browser-based terminal session, allowing you to access the instance securely without using SSH keys or opening an SSH port.
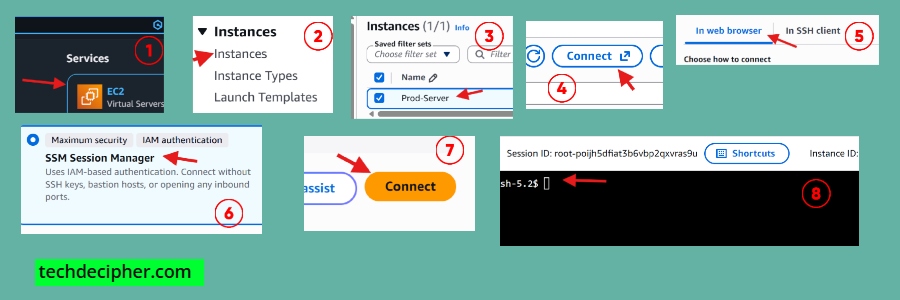
If the session opens, you now have terminal access without using the lost PEM file, and from here we can continue to follow below steps.
Step 3) Create a New SSH Key on Your Computer
Now that you have access to the EC2 Terminal using SSM. Now we will create the replacement key on our local computer, rather than inside the instance. This lets us keep the private key locally and transfer only the public key to the server. Open Terminal on Windows, or a terminal on Linux/macOS.
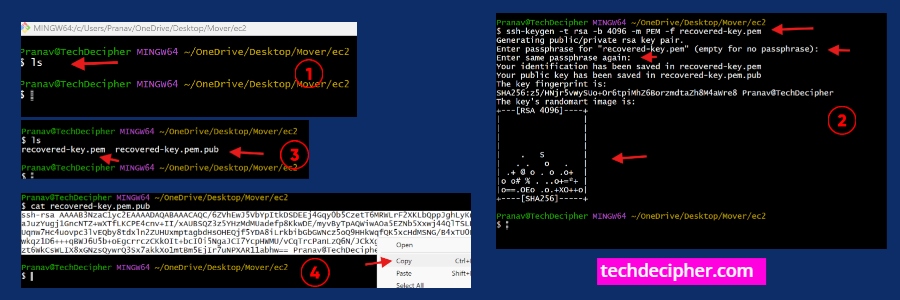
In a folder, run the following command.
Choose a passphrase when prompted, or you can simply enter 2 times, and it will generate it. If a file with this name already exists, choose another filename instead of overwriting it.
The command creates two files:
– recovered-key.pem = your private key.
– recovered-key.pem.pub = the corresponding public key.
Copy the Public Key
Copy the complete line beginning with ssh-rsa. Keep the private-key file on your computer, you do not need to paste its contents into the SSM terminal. You only need to paste the content of the file that ends with .pub.
Step 4) Add the Public Key to the Linux Account
Now go back to the SSM tab where the terminal is open. Session Manager commonly starts as ssm-user, although configured Run As settings can change this. Your SSH key must go into the account you intend to use for SSH.
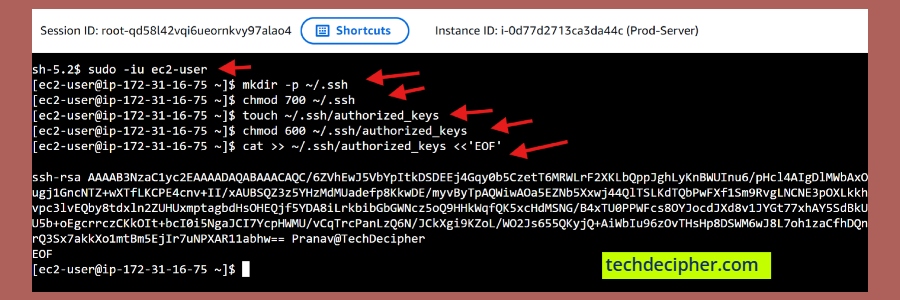
In the SSM terminal, switch to the Amazon Linux account
Prepare that account’s SSH directory and key file:
chmod 700 ~/.ssh
touch ~/.ssh/authorized_keys
chmod 600 ~/.ssh/authorized_keys
Next, replace PASTE_PUBLIC_KEY_HERE below with the complete public-key line you copied, then run:
EOF
The >> appends your key while preserving existing entries. Keep the public key on one continuous line. Switching accounts before creating these files gives new files the correct owner. It does not repair ownership problems that already existed.
Step 5) Test SSH connection to EC2 now
We have already made the necessary changes, its time we test the connection to SSH now. Open your Terminal on Linux/Windows and run below command.
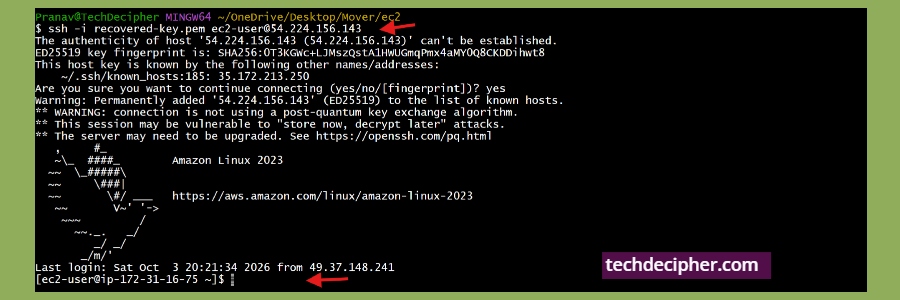
A successful login confirms that the replacement key works. And this is how exactly you can gain back the access to the EC2 instance when you loose the .pem key file.
Why Might SSH Still Fail?
Permission denied (publickey)
Check that you used the correct Linux username, selected the matching private key, and pasted its public key into that user’s authorized_keys. Also inspect file permissions and ownership.
The Connection Times Out
Check the instance address, routing, security group, network ACL, and operating-system firewall. Creating another SSH key will not fix an unreachable server.
The Private Key Cannot Be Read
Check the local file path, key format, and file permissions. Use the generated private-key file rather than recreating it by copying text between terminals.
Frequently Asked Questions (FAQ)
Can AWS recover my original PEM file?
Does Session Manager require inbound SSH access?
What if Session Manager is not available?
Conclusion
Losing an EC2 PEM file does not always mean losing access to the instance. When Session Manager is available, you can create a new key pair locally, add its public key to the correct Linux account, and test a fresh SSH connection. The key points are straightforward, keep the private key on your computer, preserve existing authorised keys, and keep your SSM session open until the replacement login succeeds. This concludes our discussion on Lost Your EC2 PEM File Recover SSH Access Using AWS SSM. How do you access to EC2 instance in you workspace prod account? Do let us know in the comments section below. If you are a new to AWS and want to create AWS account and want to connect to EC2 account then check out the blog here. We have collection of top class web tools baked right into Techdecipher.com. To go to the tools page, click here. If you need any help or have any suggestions to make, then do reach out via the contact page here. I also provide services to help you with your issues, which you can find here. Happy White Sunday!
